Welcome back! I hope you’ve had the chance to review the first part of the migration process. If not, here is the Part 1 blog on Migration of the NSX-V to NSX-T integrated with vRA-Part-1
A brief recap from part one,
1. Verification of the NSX-V environment for migration readiness.
2. Deployment of the NSX-T appliance with compatibility considerations.
3. Creation of uplink segments and configuration of the uplink profile with a teaming policy for the edges.
4. Deployment of the edges and integration with NSX-T manager.
5. Conducting a ping test between Edge TEP and NSX-V Host VTEP.
6. Establishment of T0 and uplink configuration with BGP neighborship.
In this blog post, we will be examining the Second step of Migration:
Step 1: Add the new NSX-T on vRA.
Below are the step to add NSX-T to vRA,
1.We login to the vRA GUI.
2.On my service page we click on the cloud assembly.

3.The we click on Infrastructure and navigate to connections on left panel, then click on cloud accounts and click <add cloud account>.
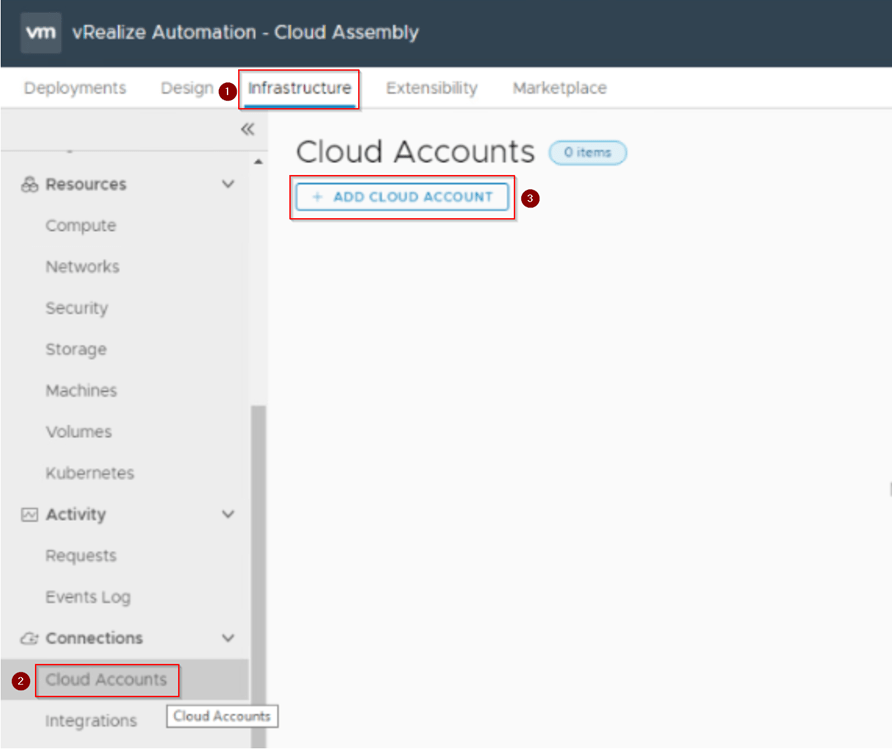
4.Once we click on add account, we can see vRA can integrate multiple components like vcenter, NSX-T, NSX-V etc… We need to click on NSX-T as we are adding NSX-T account.

5.After we click on NSX-T, we can see now it prompt us to provide all the details related to NSX-T, like FQDN or IP address on NSX-T with credentials. We provide those details and click on validate.Once we click on vlaidate we are prompted with untrusted certificate. Accept the certificate.
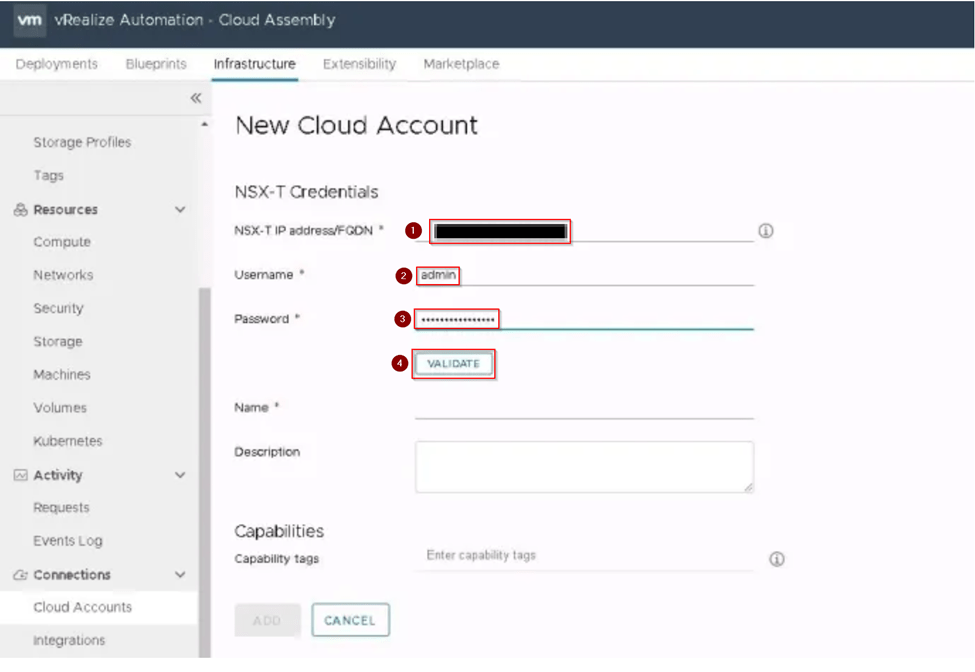
6. Once we have credentials validated successfully. Provide the Name for the NSX-T, then select NSX-T registered vSphere endpoint and click on Add.

7.As we click on add then we can see the added NSX-T is listed as OK status. Which confirms us that we have completed adding our NSX-T on vRA.

We have added our NSX-T manager on vRA and ready to create the Migration plan.
Step 2: Creating the migration plan
This step means we are ready for the migration and no changes like creating the network profile will be taken place as vRA will be in MM.
So, we make sure all the vRA administrators are prior informed then only we proceed with following steps.
1.We login to the vRA GUI.
2.On my service page we click on the vRA Migration Assistant.

3.As we are migrating our environment NSX-V to NSX-T. We expand the NSX V2T Migration and click on Migration Plans.
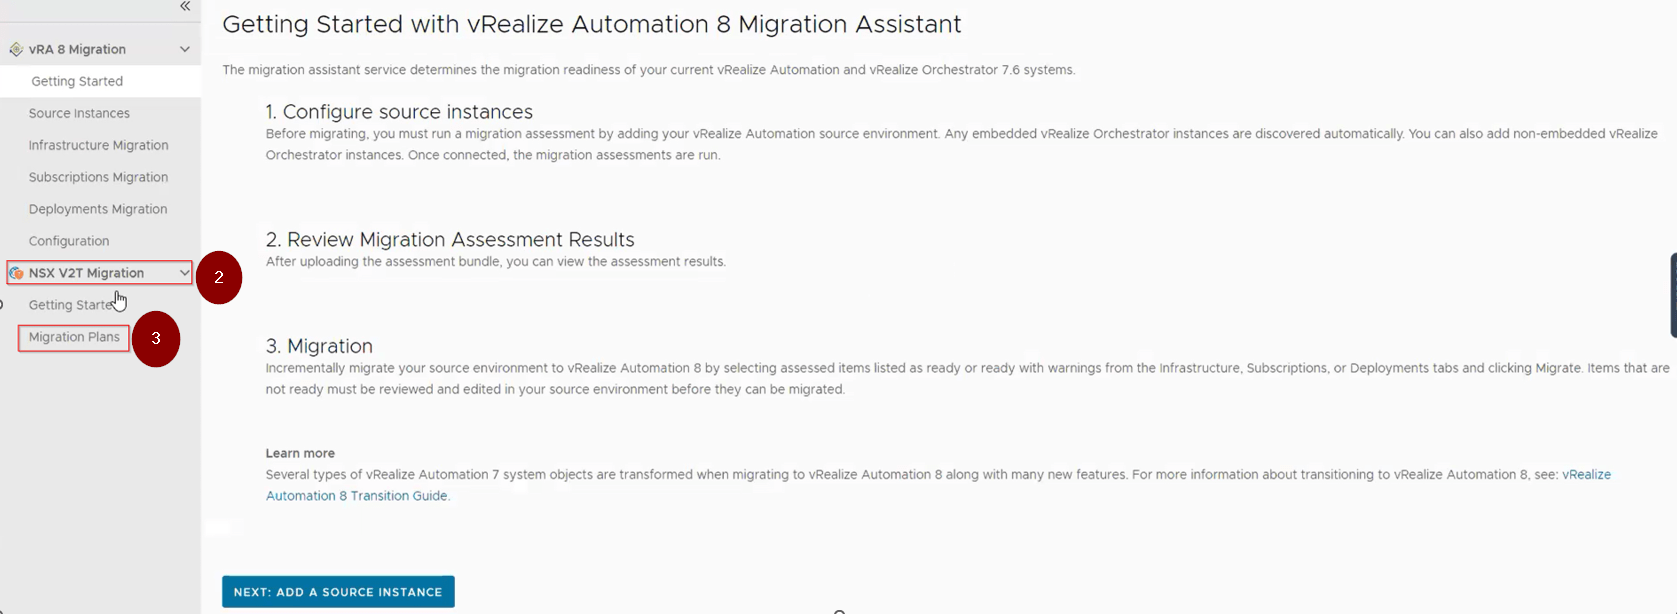
4.Once we click on migration plans, we see an option NEW PLAN click on it.

5.By clicking on add new plan, we see multiple fields which need to be filled with the details accordingly, we fill the details in following steps as below,
1. NSX Accounts-We provide plan name, Source NSX-V and target NSX-T details. Once all the details are provided click Next to move on next page of migration plan.
Note: We can observe in this page the pre-requisites,
1. That is mentioned, we need to add the target NSX-T account which we have added on our earlier steps. Hence prior creating the migration plan we need to add the NSX-T account on vRA.
2.The target NSX-T cloud account must not be associated to a vCenter server account on vRA. This association will be created later in the migration process.

2. Assessment-Here we click on Run Assessment which will evaluate NSX-V objects and checks if they can be migrated. Once we see the status as Ready on Summary tab. We cross verify all the tabs like Network Profile and Network which shows us the status is ready for migration. When we are satisfied with assessment then click Export. This exported file will help us with post migration testing before we take vRA account out of MM. Then click Next to move on next page of migration plan.

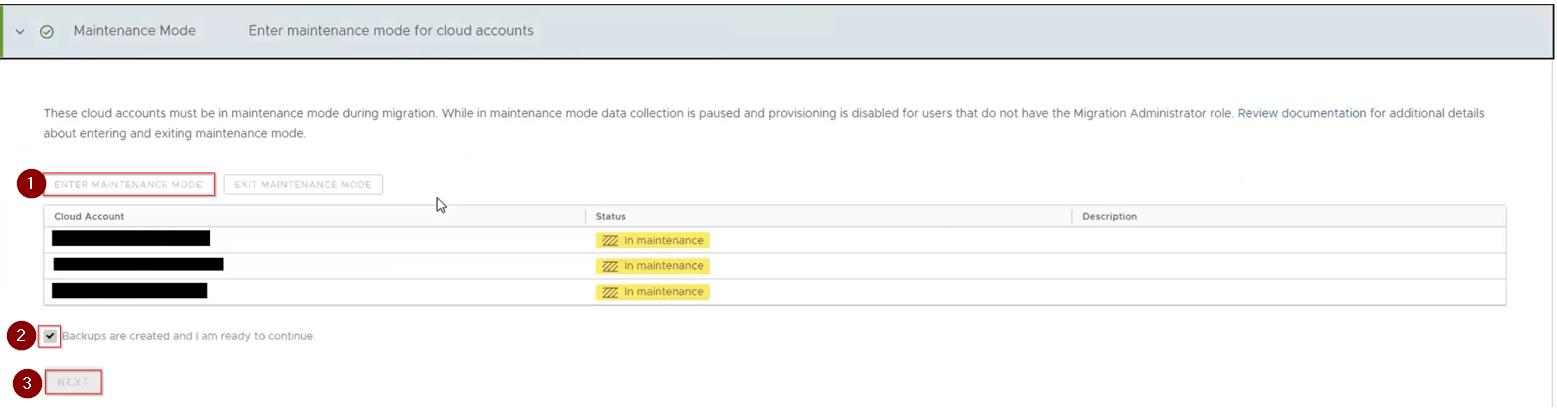
3. Maintenance Mode-Now we are on that next step which will take the vRA account into MM. Here we click on Enter Maintenance Mode. Prior that we must assure, we have taken the backup of the vRA and then hit enter maintenance mode and click Backups are created and I am ready to continue, then click Next to move to next page of migration plan.
4. NSX Migration-On this page of migration plan, we create the deployment configuration file by clicking CREAT FILE.
Note: If we receive and errors about the object which are not ready for migration, we address it error and then click on Reassess. The create file will not be enable if any error is occurring and after fixing it until we click on Reassess.
After we have clicked on Create file, we are prompted to save the .json file save it at required location. This file will be uploaded on NSX-T migration coordinator later.

At this point the vRA task are paused and we come back to Step 4 NSX Migration once we have the output mapping file which is generated by the NSX-T Migration coordinator after the host migration which is final step of Migration form NSX-T side.
Step 3: Enabling the Migration coordinator service on NSX-T
Now let’s move our focus towards the NSX-T, where we will proceed with enabling the migration coordinator service.
Below are the steps we will follow for enabling the migration coordinator,
1: Login to the NSX-T via GUI, click on System and navigate to Migrate on left side panel and click on it. We observe that the Migration coordinator service is not enabled.
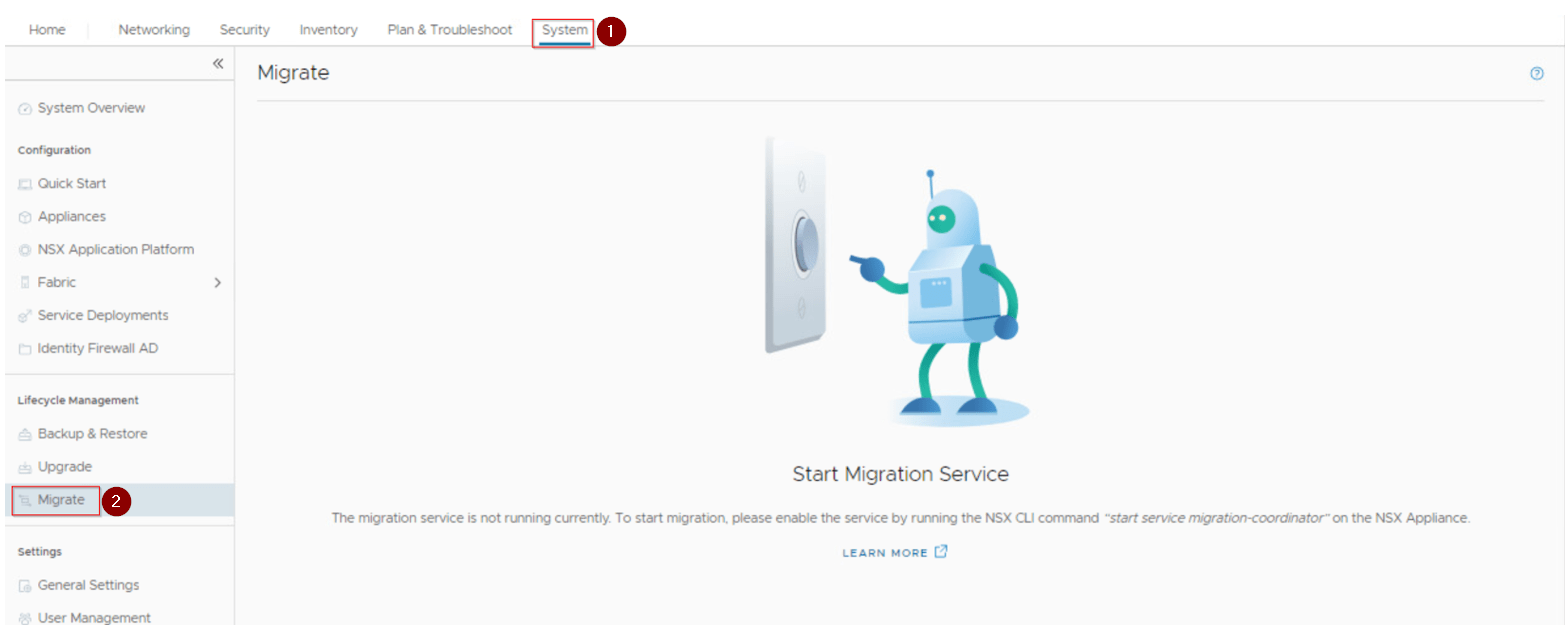
2: On GUI we just checked migration service is not running and to start the service we need to take CLI of NSX-T and run command start service migration-coordinator and close the ssh session.

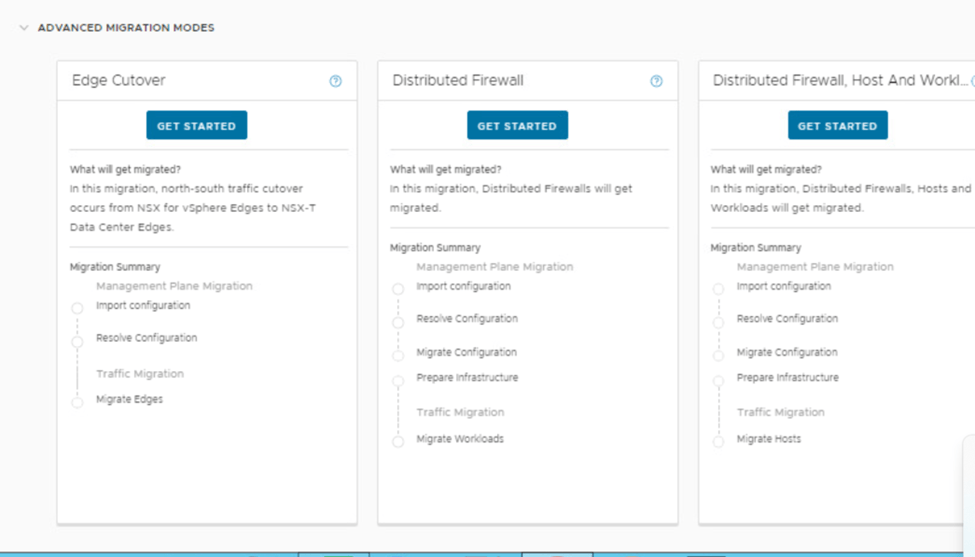
3: Login back to NSX-T GUI if logged out, if the earlier session is still active then refresh the page to see that the migration service is enable and we can see 2 type of migration modes Standard and Advance Migration Modes.
By default, the Standard Migration Modes is expanded, in this we see 3 modes,
1.NSX for vSphere
2.vSphere Networking
3.vRealize Automation
The Advance Migration Modes has 3 modes,
1.Edge Cutover.
2.Distributed Firewall.
3. Distributed Firewall, Host and Workload.
We get to see what each mode in Standard and Advance Migration types can migrate. Based on which type is required we select that migration type from the respective modes.
In our case we will go with Standard Migration mode type vRealize Automation with User defined topology.

At this point we come to mark where we complete the adding new NSX-T in vRA, entering it in Maintenance Mode (MM) and enable migration coordinator service on NSX-T as successful completion, which concludes part 2 of our blog. In this phase, the following steps were executed:
1. Adding the NSX-T on vRA.
2. Creating the Migration plan for the migration of vRA.
3. Moving the vRA account into Maintenance mode by making sure the assessment status is ready.
4. Generating the .json file and saving it on the location, so that we can use it on NSX-T Migration coordinator
5. Enabled the Migration coordinator service on NSX-T.
6.Overview on modes of Migration and their respective types.
All steps are executed with precision, in compliance with the best practices and guidelines of the vRealize migration process. The successful completion of this phase sets the foundation for the next stage in this initiative.
The forthcoming blog post will expound on a subsequent step in which the Migration process will be explained along with exporting the output mapping file after host migration is completed and importing of the file to vRA, then migrating the source to target account on vRA,testing and removing the vRA from MM. This post aims to provide a comprehensive and detailed guide on these crucial processes.
Below are the Reference Links,
https://docs.vmware.com/en/vRealize-Automation/8.10/vrealize-automation-v2tmigration/GUID-913504AC-56EC-4C44-A979-81E9C37512CB.html
https://docs.vmware.com/en/VMware-Aria-Automation/SaaS/Using-Automation-Assembler/GUID-9AC61682-75D5-4576-8BB9-E654156FA02E.html
If you have any specific concerns or questions, please let me know, I’ll will be glad to hear them and do my best to address them.
Thank You Will Meet You Soon with The Part-3…
Tags: cloud, nsx, nsx-t, V2T Migration, vmware, vRealize, vsphere

April 23, 2024 at 6:51 pm
[…] Based on VMware technologies, this site likely provides information and learnings related to software-defined data centers.VMware NSX for network virtualization for IT professionals and organizations using VMware products to optimize their infrastructure, enhance security, and streamline operations. « Migration of the NSX-V to NSX-T integrated with vRA-Part-2 […]