Hey, all welcome back, hope you may have gone through the first two parts of the migration process, if not here is the part-1 and part-2 blog.
To have better understanding what we will proceed in this blog. Small Overview from previous blogs,
1. Verification of the NSX-V environment for migration readiness.
2. Deployment of the NSX-T appliance with compatibility considerations.
3. Creation of uplink segments and configuration of the uplink profile with a teaming policy for the edges.
4. Deployment of the edges and integration with NSX-T manager.
5. Conducting a ping test between Edge TEP and NSX-V Host VTEP.
6. Establishment of T0 and uplink configuration with BGP neighborship.
7. Added NSX-T account on vRA.
8. Created the migration plan on vRA and added it in to Maintenance Mode (MM).
9. Generated the .json file and saved it on system.
10. Enabling the migration service on NSX-T.
11. Overview on the different type of migration modes and its types.
Third Step we break into sub steps,
Step 3a: We will focus on the workflow of migration and start the migration process and take a pause on Edge Migrate workflow.
Step 3b: Will focus on Edge Migrate, Host Migrate and then removing of vRA out of MM by providing the mapping file from NSX-T after host migration flow.
This blog we will explore the step-3a and understand the standrad migration flow of NSX-T.
On our earlier blog we have seen the different modes of migration and its respective types with migration coordinator on UI of NSX-T. However, to mention we have 2 types of high-level migration methods.
1.In-Parallel Migration: In this method, the NSX-T infrastructure is deployed on different hardware which is not part of existing NSX-V infrastructure. Here some components of NSX-V and NSX-T, such as management cloud co-exist, however the compute clusters running the workloads will be running on different hardware.
Advantages via this method, is we have flexibility on migrating the workloads via lift and shift to new NSX-T infrastructure with cross connectivity between the 2 domains using NSX bridging as an when required no time bond required for completion of migration in one long downtime window.
Note: In built migration coordinator of NSX-T can we used to migration certain configuration like DFW only migration.
Disadvantages via this method, is we require a new hardware, topology and all policies related to NSX-V cannot we leveraged, it needs to be created manually on NSX-T, vMotion has certain limitations which could result in downtime based on the type of the vmotion we select which needs to be taken into consideration. Please follow KB article 56991 for more details. Managing of 2 infrastructures until the migration is completed.

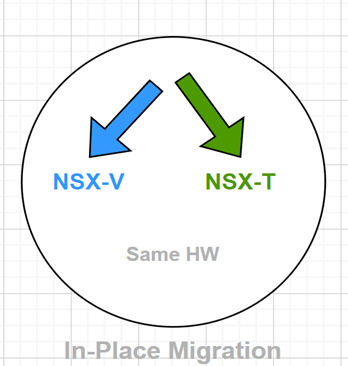
2.In-Place Migration: This is the method, we are using in our migration and the different modes and its respective type which we discussed on our part-2 blog, we use the NSX-T built in migration coordinator tool which helps us to replace NSX-V in-place on existing hardware with NSX-T. Which includes importing the existing configuration from NSX-V and applying it on NSX-T. Migration coordinator supports Maintenance Mode (MM) and migrates the compute hosts running workloads by automatically placing the host in MM removing the NSX-V VIBs and installing NSX-T VIBs.
Advantages via this method, we have no requirement of new hardware, its one stop for complete migration of the NSX-V to NSX-T no major configuration or complete configuration require on NSX-T. If its fixed topology, deploy the managers and edges and rest everything will be taken care by coordinator. If its BYOT other than deploying the manager, we need to configure the edge with routing protocol and rest all configuration are migrated.
Disadvantages via this method, we need to have single downtime and finish the migration in one shot, no flexibility of migrating host in multiple downtimes.
Below are the 5 main steps of any mode and its respective type we use in migration coordinators tool.
1.Import Configuration.
2.Resolve Configuration.
3.Migrate Configuration.
4.Migrate Edges.
5.Migrate Hosts.
From above information, hope we must have got fair understanding of the migration process.
Let’s resume our migration and proceed with following steps and complete the migration.
Make ourselves aware with the requirement, as we are doing vRA integrated migration of NSX-V to NSX-T, so form our previous steps carried out make sure all the below points are in place,
1.JSON file generated from vRA is available.
2.NSX-T environment is stable and Migration service is enabled.
3.Edges are deployed, and all related configurations are in place (like T0s configured, and neighbors are up on it etc.…).
We make sure no changes are done once we are started and in between the migration on NSX-V side.
Step 1:
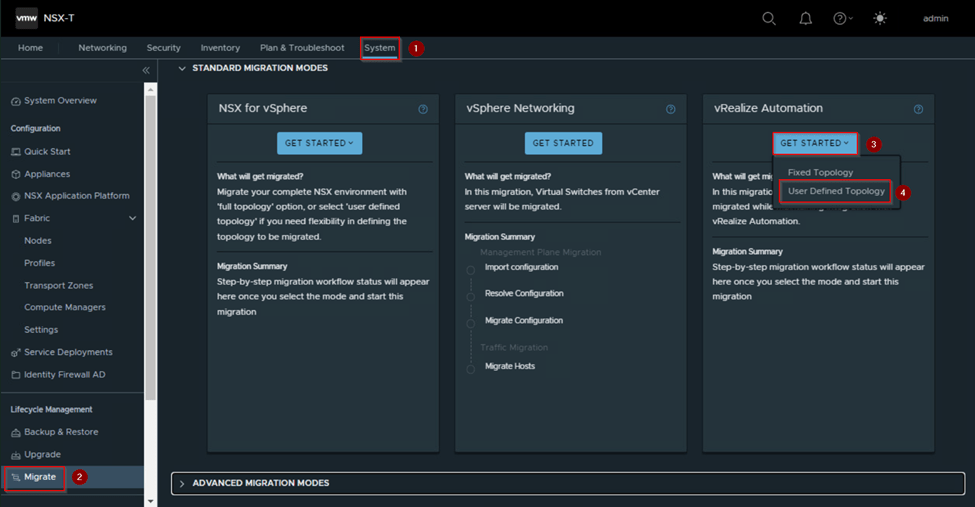
Login to NSX-T manager and click on System and on left panel under lifecycle management click migrate option, as we see on right side the standard migration modes under that click on get started under the vRealize Automation, select, and click on user define topology.
Step 2:
As we see new prompt of migration workflow of vRealize automation with user define topology.
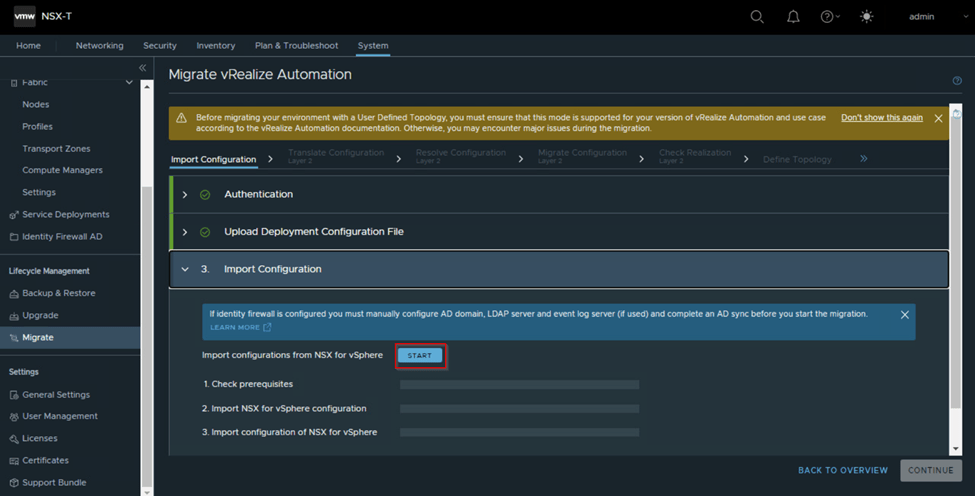
Import Configuration:
1.Authentication: Here we authenticate our NSX-V environment and vCenter server by clicking on select NSX.

Once we click on select, we get a new prompt asking for NSX-V and vCenter FQDN/IP address and credentials details. We provide it and click on Authenticate.
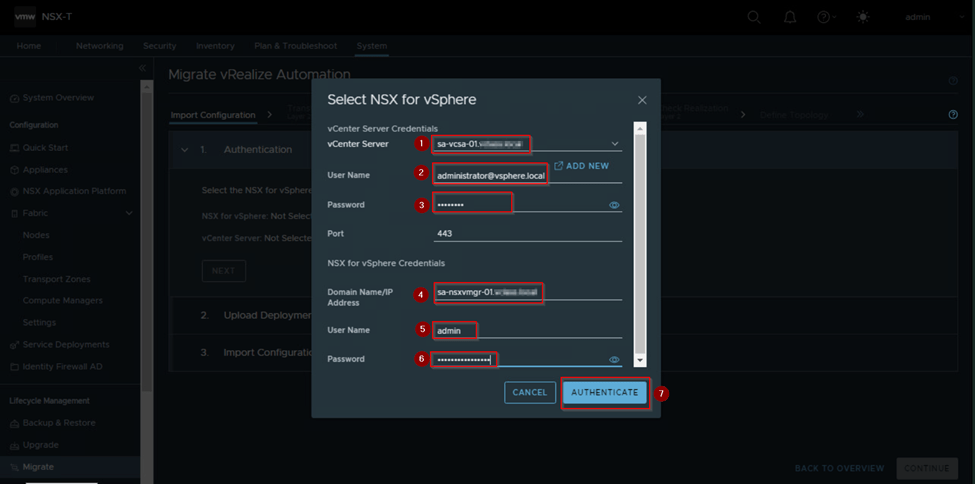
Once we click authenticate the credentials provided windows closes and if all the provided details are correct, we get Authentication successful flash which means we can proceed further.
Also, under authentication we can see the NSX-V and vCenter version information and role is populated.

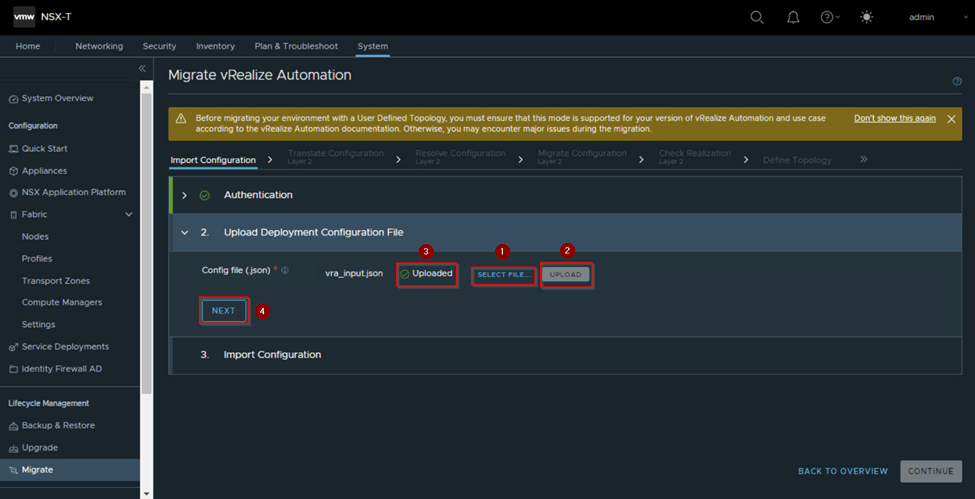
2.Upload Deployment Configuration File: We are good to click on next under authentication to proceed further and upload the deployment configuration file. Which is the JSON file which we had generated on vRA and is entered in MM.
Here click on select file and after selecting the file from system we click on upload and then click Next.
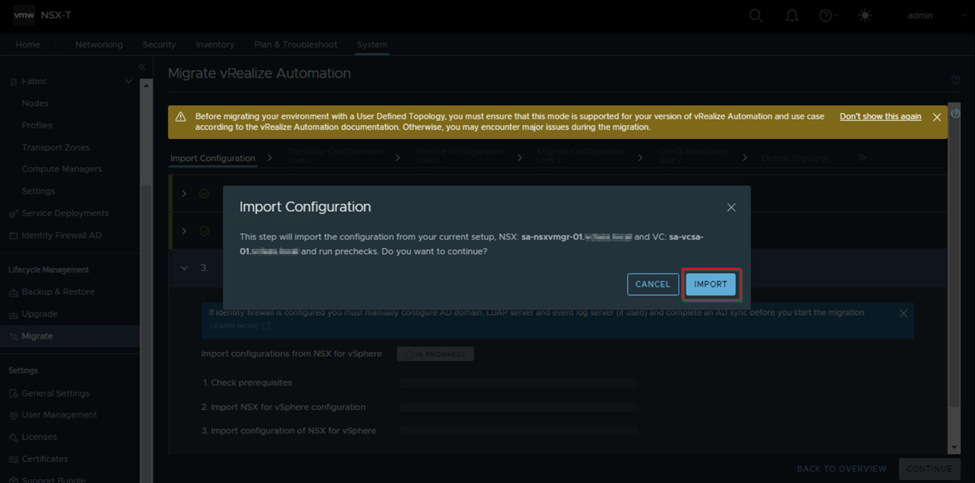
3.Import Configuration: Once we click next under upload deployment file now, we are ready to import the configuration. Here once we click on Start it prompts one window saying it will import configuration of NSX-V, vCenter and run precheck. Click import. Here it does the pre-requisites check like the NSX-V environment is healthy and stable, then it imports configuration of NSX for vSphere configuration and then imports configuration of NSX for vSphere.
As we click on import, it might take some time to validate and import the configuration and the check prerequisites, import NSX for vSphere configuration and import configuration of NSX for vsphere needs to show the status as successful. If any of the import fails or the import configuration is successful and for any reason unwantedly there was some change on NSX-V then we need to rollback and import the configuration again.
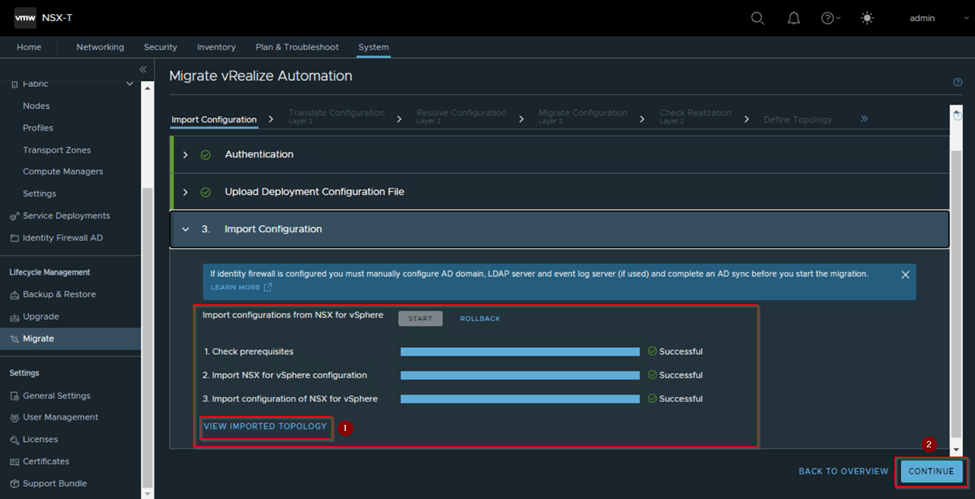
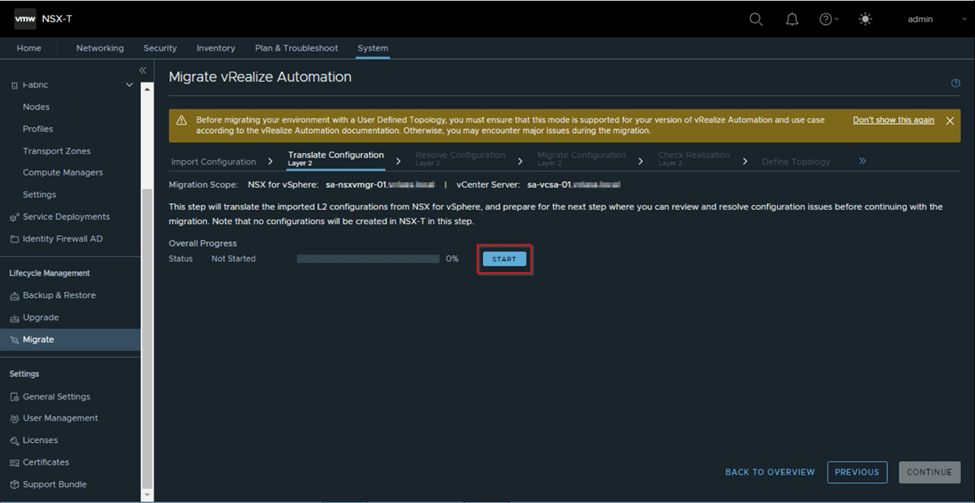
Now we will move the next flow of migration once we have imported the configuration before that if we want to have look on the topology, we can click of view imported topology and see the NSX-V topology imported as shown one example below and click continue which will take us to next flow which is Translate Configuration Layer 2

Translate Configuration Layer 2:
As the name suggests this will translate the imported L2 configuration from NSX for vSphere and prepare for the next flow. Let’s click on Start and wait for the overall status to complete successfully.
If it fails as below, as we had not attached the correct .JSON file is one issue, we need to investigate the reason of failure and then fix it and rollback this flow and then re-try again this flow. In our case the JSON was not attached correctly we need to roll back this flow as well as the import configuration flow and upload the correct. JSON and import the configuration once again.

After fixing the issue we get the overall status as successful. We are good to click on continue to move forward to the next flow which is Resolve Configuration Layer 2.

Note: Till now on NSX-T no configuration is created.
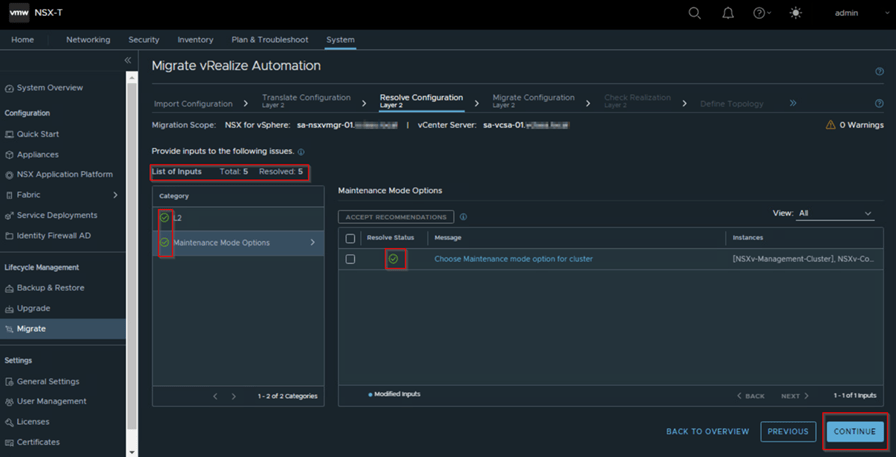
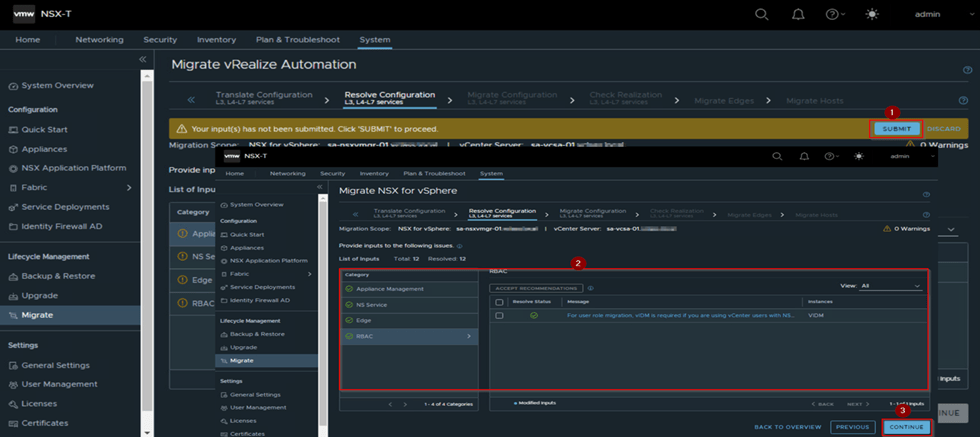
Resolve Configuration Layer 2:
Based on the environment we get some of category issue listed on left panel like L2 which has sub-lists of issues for which we provide inputs as per our requirement and environment or accept the recommended inputs on this flow and mark it as resolved, we need accept it respectively so that the issue is marked as resolved for each category and then we can proceed with next flow by clicking on continue.
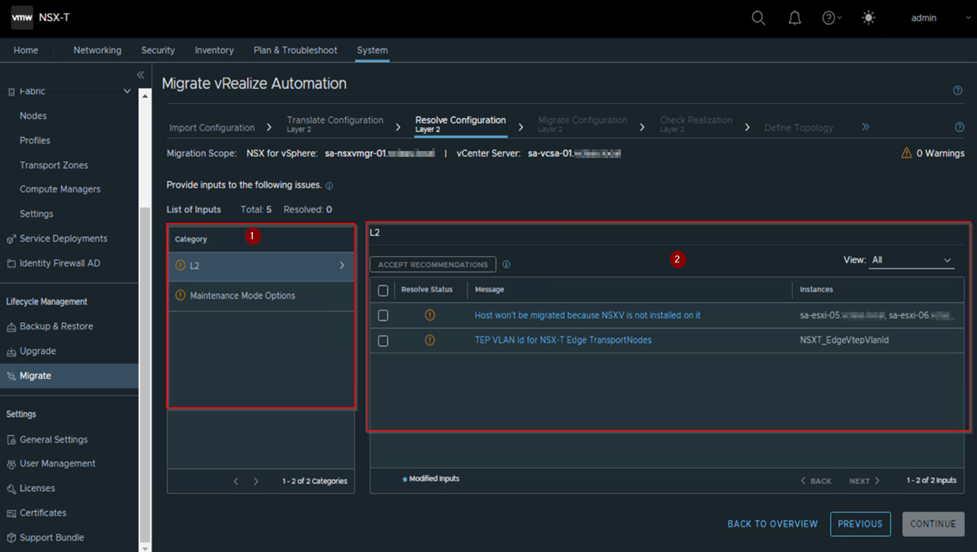
Let’s fix or accept the recommendation of the listed category. In L2 we see that 2 hosts are not prepared for NSX-V, and it won’t be migrated. If we are okay with it which in our case yes, then we accept it, if not we make sure this host are prepared for NSX-V, which mean we have to rollback till import configuration flow and then re-import the configuration then this recommendation will not be listed.
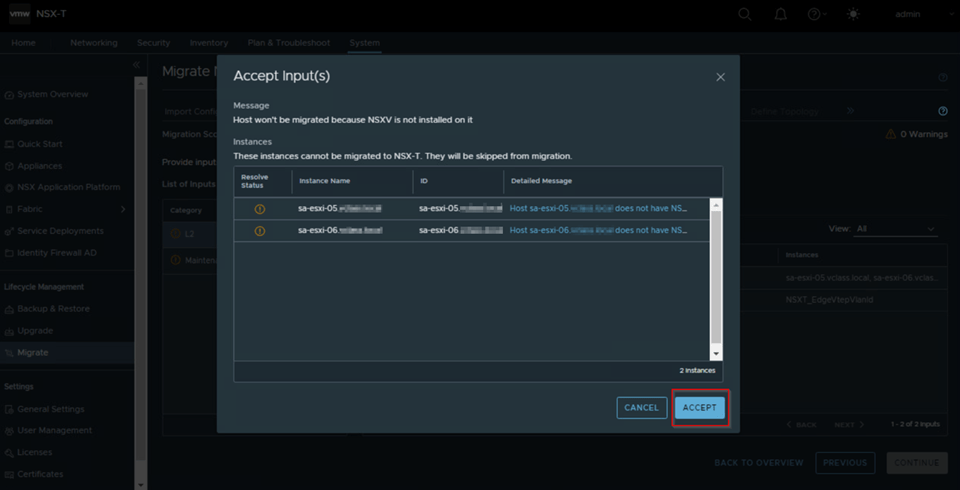
Once we accept, we need to submit and then proceed with the next one or fixing all and then submit also work. Here we have followed submitting for each list.
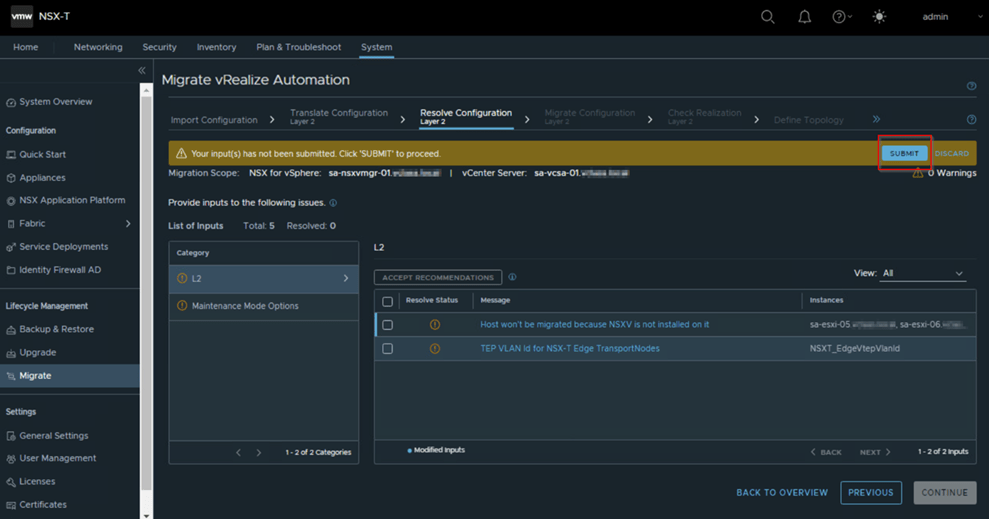
We see that one recommendation is marked as resolve with green check mark, same way if we resolve the issues of all the category and lists will be marked as resolved and then only, we can proceed with next flow. Until then the continue button down on right corner will be greyed out.
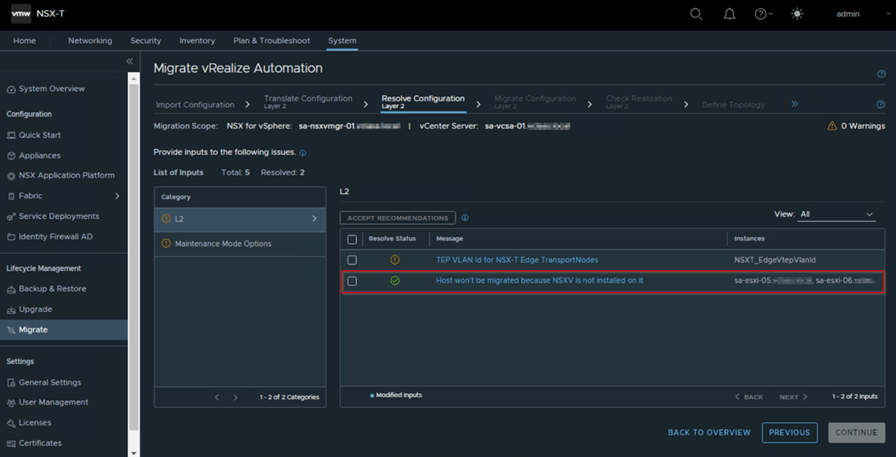
Now same way we will proceed with other categories and make sure all the issues are marked as resolved based on the recommendation or based on your inputs, it will migrate those configurations of Layer 2. Then we click to continue to proceed with next flow Migrate configuration Layer 2
Migrate Configuration Layer 2:
Based on the previous flow inputs, accepting the recommended default configuration and with imported configuration of NSX-V the Layer 2 configuration is migrated to NSX-T, So make sure we don’t make any changes on both NSX-V and NSX-T unless we see any blocking issue or the migration fails in this flow. Complete rollback would be required, if any changes are made in requirement to fix the failure on this flow or any flow in this migration process.
We click start upon prompt of new tab we click migrate and wait for the process to get completed successfully.

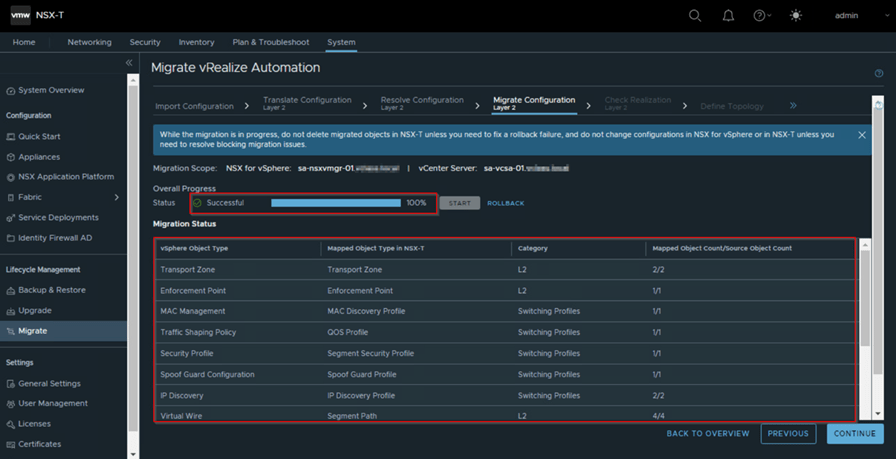
As we see above capture the L2 configuration is migrated, and the list of mapped NSX-V vSphere object are mapped based on the imported configuration and provided inputs by us in our earlier flow.
Now let verify the Segments, switching profiles, QoS profiles and so on Layer 2 configuration which are got migrated.
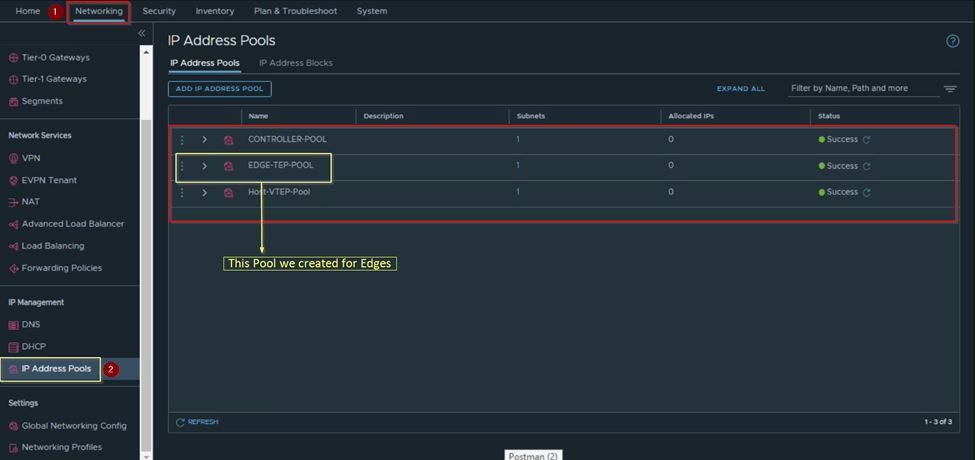
In below captures we can observe Segments which are got migrated, as we had created only 2 segments for the T0, rest all are migrated from NSX-V environment. Same way the pools we had created only for edge TEP, remaining have got migrated.

From the captures we can make out that only Layer 2 related configuration are migrated, below capture we can observer that no Layer 3 configuration are reflected like the Tier 1 and security configuration. Which will get migrated in upcoming flows.

So, once we have verified the L2 configuration, we come back to migration workflow page and resume to proceed on next flow which is check realization Layer 2
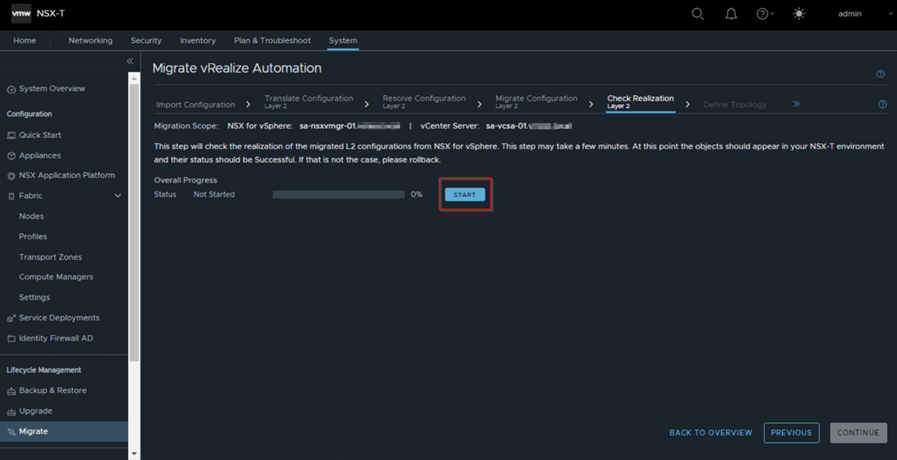
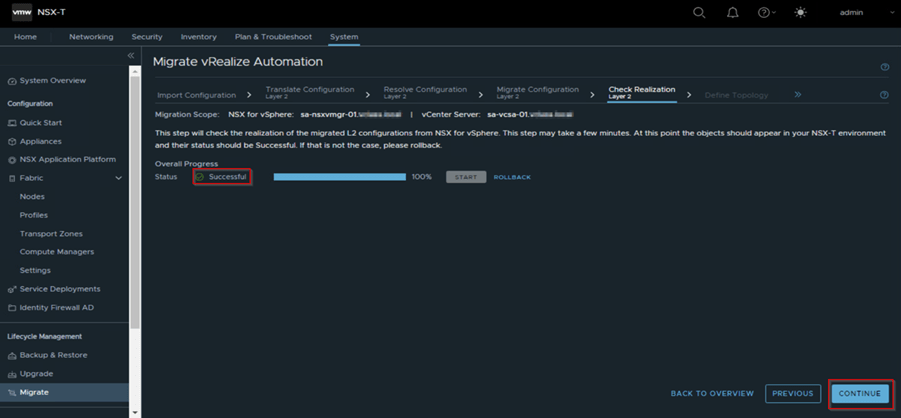
Check Realizations Layer 2:
Here this flow checks the migrated L2 configuration from vSphere NSX are reflecting on NSX-T. If not, then we need to rollback by checking the reason for the failure and re-import the configuration and re-run till this flow. Click start and wait for the overall progress to completed with green check mark with status as successful and click continue to proceed with next flow Define topology.
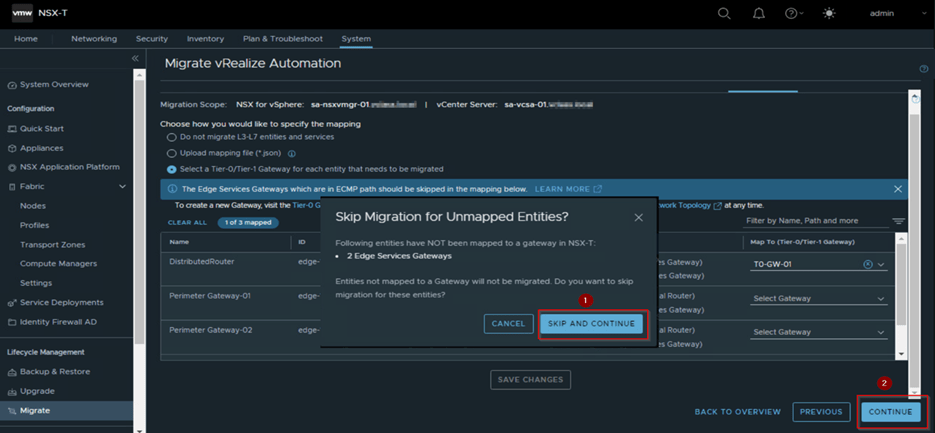
Define Topology:
In the flow we define our L3 related configuration to migrate by specifying the mapping as we see in the below capture which have following options,
1.Do not migrate L3-L7 entities and services: Which mean do not migrate the DLR, edge service gateways and other services like DFW, gateway firewalls.
2.Upload mapping file (*. json): So here if you have created a mapping to topology in the NSX-T setup in edge services gateway and DLR from NSX for vSphere environment. We should not compare this .json with the generated .json from vRA which we uploaded at the Import configuration workflow.
3.Select a Tier-0/Tier-1(T0/T1) Gateway for each entity that needs to be migrated: We will go with this option as we have created the T0 and no T1 as those will be created form the vRA .Json file and mapped or connect to T0. This option is generally selected, and Mapping is done based on the requirement.
Below capture will provide a better understanding of this option for us.

We may observe in above capture we have selected T0 for Distributed router and left the perimeter Gateway 1 and Perimeter Gateway 2 without selection. Reason we have the edge cluster already created no need to migrate these gateways.
We save changes and click on continue which will prompt saying entities are not mapped to gateway will not migrate, so do you want to cancel or skip & continue click on skip and continue and proceed to next flow Translate Configuration L3, L4-L7 Services.
Translate Configuration L3, L4-L7 Services:
This flow will translate all L3 and L4-L7 services imported configuration of vSphere NSX along with the mapping of the T0 which we had done on previous flow.
Click on Start and wait for the status to get completed successfully. If any issue seen, we need to address it and rollback and re-import the configuration again if any changes done on NSX-T or NSX-V.
Note: No configuration will be created related to L3 and L4-L7 in this flow.

Resolve Configuration L3, L4-L7 Services:
Once we have click continue previous flow, we will be on this flow where we will resolve the configuration issues or accept the default recommendation, this flow is like the Resolve Configuration Layer 2 only difference we will see the category and list related to the L3 and L4-L7 services. Below capture will provide some references for us.
Application Management category we see this list shows NTP related configuration is present already do we want to migrate it or not.
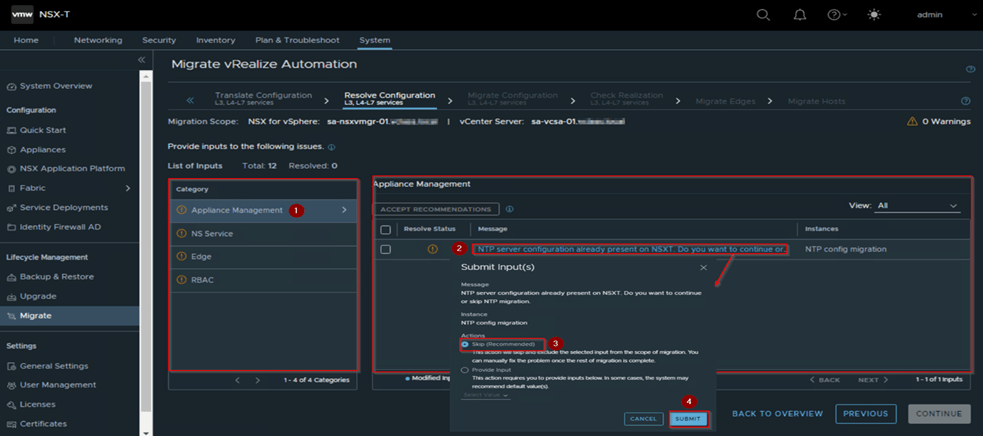
So based on the requirement and environment we either select skip or provide input option. We proceed with selection of Skip which is by default recommended and then click on submit.
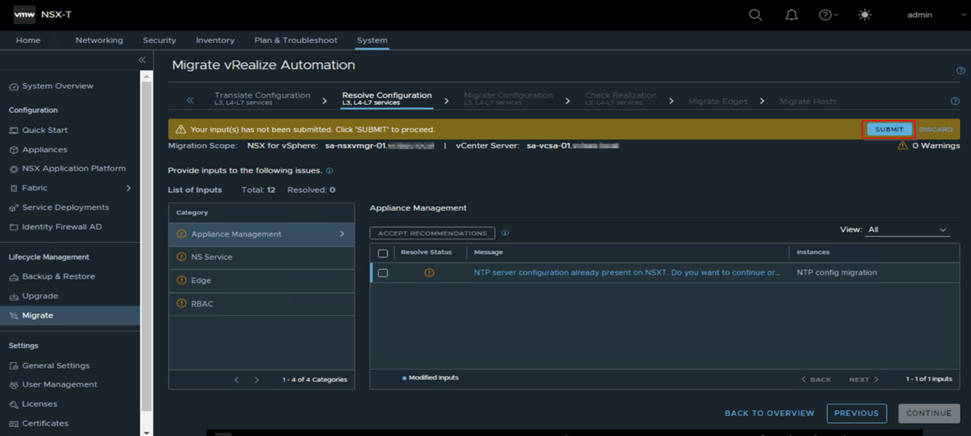
We make sure all lists in all categories and categories are mark as resolved. Later only we can proceed with continue to next flow Migrate configuration L3, L4-L7 services.
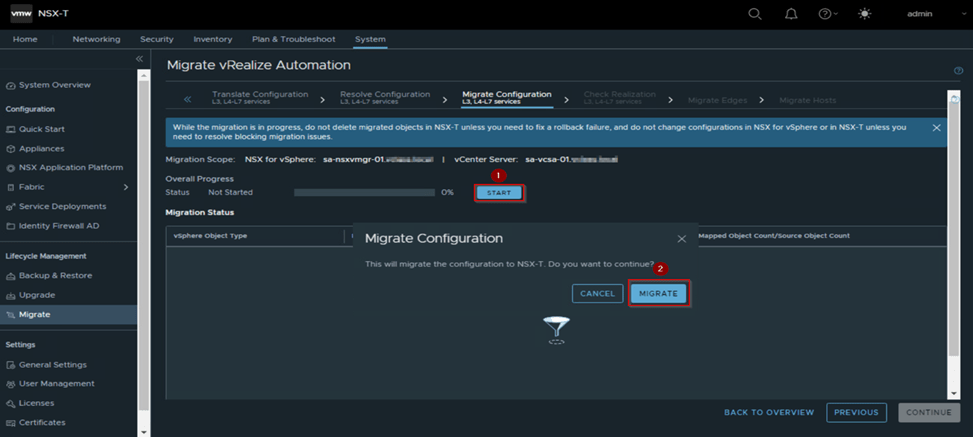
Migrate Configuration L3, L4-L7 Services:
This flow once we click on Start will migrate the NSX-V L3 and L4-L7 service on the NSX-T , If any failure we need to fix it roll back and retry this workflow, if not we need to roll back till import configuration flow and come till this flow.

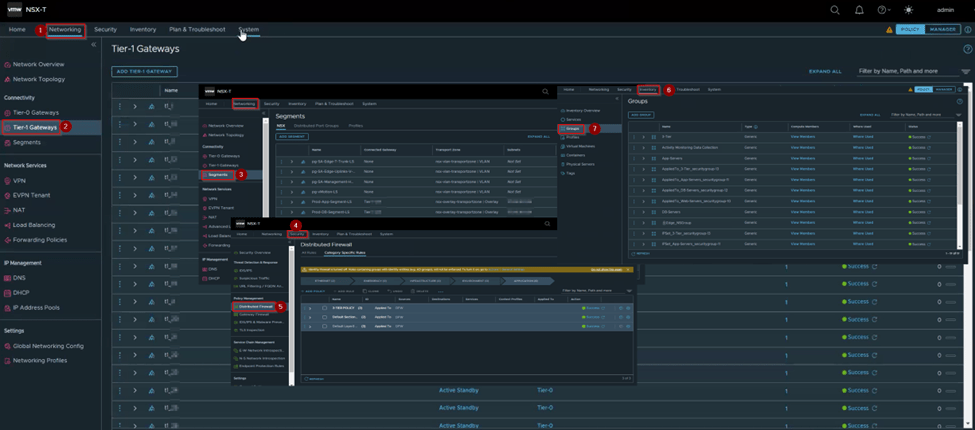
Once this flow completes successfully as we see in above capture which takes few minutes based on the environment, we see under migration status the L3 and L4-L7 category are migrated we cross verify the configuration like in our case segments getting attached to T1, T1 (due to vRA. json) are created, DFW rules, groups and so on are reflected on NSX-T.
Once we verify the configuration related to L3 and L4-L7 services are reflecting, we come back to the Migrate page resume the migration and click continue to next flow Check realization L3,L4-L7 services.
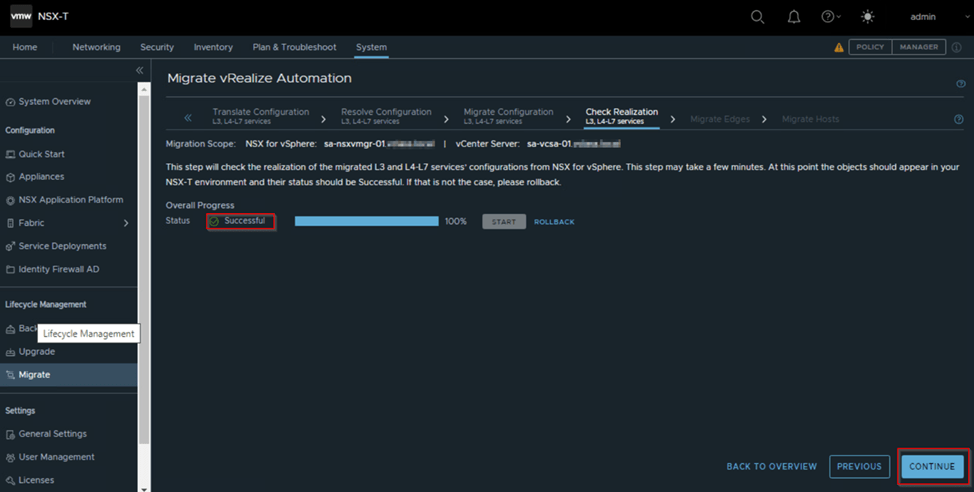
Check Realization L3, L4-L7 Services:
This work is like the earlier workflow of Check realization Layer 2 as in there the realization of Layer 2 configuration took place in this work flow it will realize the L3, L4-L7 configuration from NSX for vSphere. If this flow fails, we need to fix the issue and re-try the flow or we need to roll back all the way to import configuration, do the changes on NSX-V or NSX-T based on the issue and reimport the configuration.
In work flow we click on the start and wait for the progress to complete successfully and then continue to the next flow Migrate Edges.
At this point we have reached to the end of part 3a where we understood high level types of migration methods i.e. In-Place, In-Parallel migration and its advantages and disadvantages.
We resumed our migration by initiating the migration and went through each workflow of the migration process till Check Realization L3, L4-L7 Services Workflow.
In next blog we will resume with substep 3b and migrate our edges, host, then finish the migration on NSX-T after we get the mapping file ,then remove the vRA from the MM and have a walk through on post migration process.
Below are the reference links,
https://docs.vmware.com/en/VMware-NSX-T-Data-Center/3.2/migration/GUID-7899A104-2662-4FC9-87B2-F4688FAEBBBA.html
If you have any specific concerns or questions, please let me know, I’ll will be glad to hear them and do my best to address them.
Thank You Will Meet You Soon with The Part-3b…
Tags: nsx, nsx-t, V2T Migration, vmware, vmware-by-broadcom, vmware-cloud-foundation, vRealize, vsphere

Leave a comment