Overview of IDS/IPS
The aim of NSX Intrusion Detection and Prevention Service (IDS/IPS) is to monitor network traffic on hosts and edges for malicious activity by comparing it against a known set of signatures.
The NSX IDS/IPS monitors network traffic on a host for suspicious activity by comparing the traffic against predefined signatures. Each signature defines a pattern for a specific type of network intrusion that must be detected and reported. Upon finding a matching traffic pattern to a signature, a predetermined action is triggered, such as generating an alert or blocking the traffic from reaching its intended destination.
IDS can be implemented in two methods,
- Knowledge-based Signature: These signatures are known by which we can detect malicious instruction sequences specified in the signatures. Hence this method is limited to attacks that are already known. It does not cover the zero-day threats.
- Behavior-based detection: In this method the detection is behavior based. The events which are called informational or info and consists of events that pinpoints the unusual activities in network that are not malicious but provides information while investigating a breach.
Pre-requisites:
- To use IDS/IPS on NSX-T we should have the licenses of Threat Prevention. To know more about licenses check here.
- We make sure for IDS/IPS NSX Edge VM is deployed with at least large form factor.
Considering the above pre-requisites. Let’s begin the configuration of IDS/IPS.
Configuring/Enabling IDS/IPS
Login into NSX and navigate to Security –> Policy Management–>IDS/IPS & Malware Prevention.
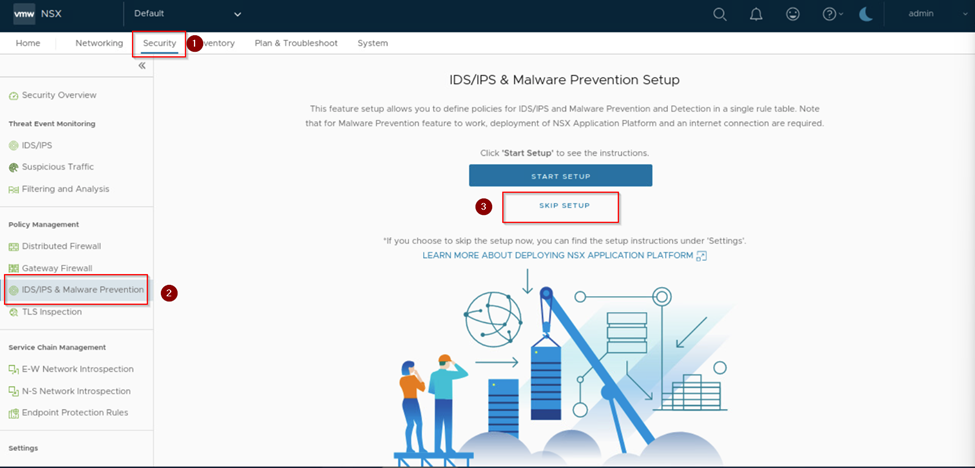
As per above capture in our case we will skip the setup and proceed further. We click on settings on same window and enable the IDP/IPS on All standalone hosts and click yes.
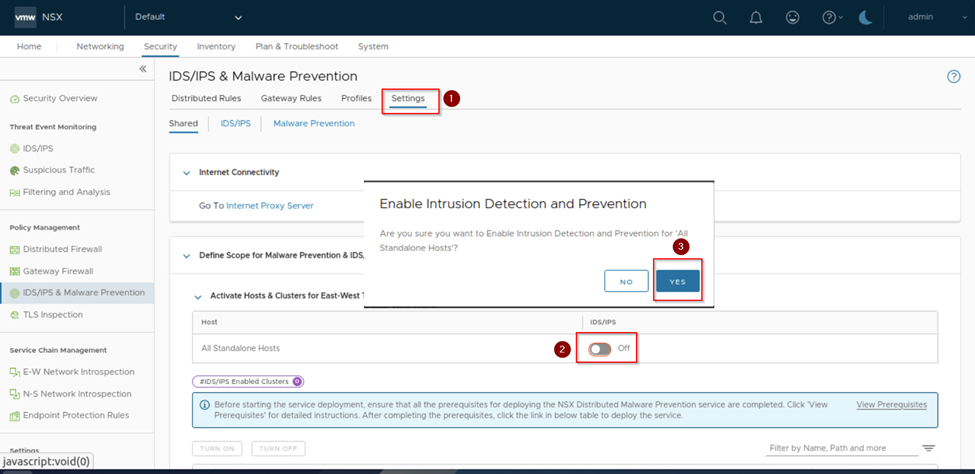
Once we have hit yes we scroll down on the same page and select the cluster on which we want to enable IDS/IPS. Here we are enabling it on the compute cluster by selecting it and clicking on turn on.

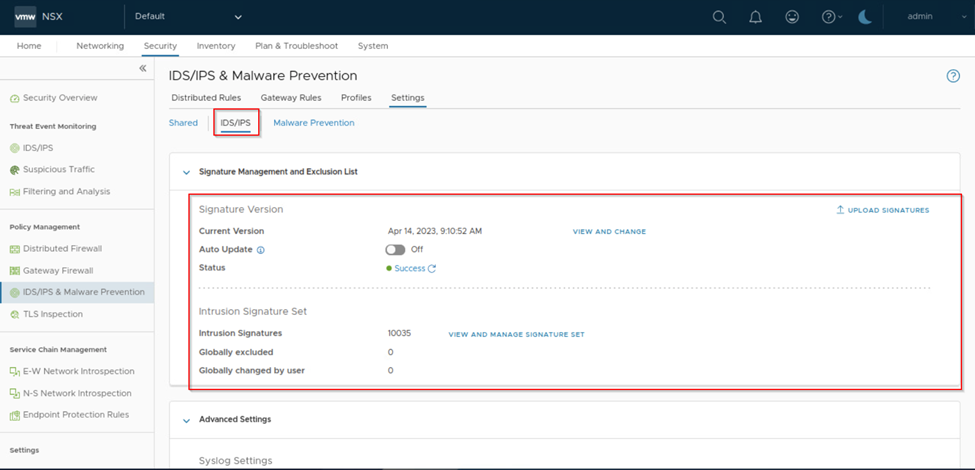
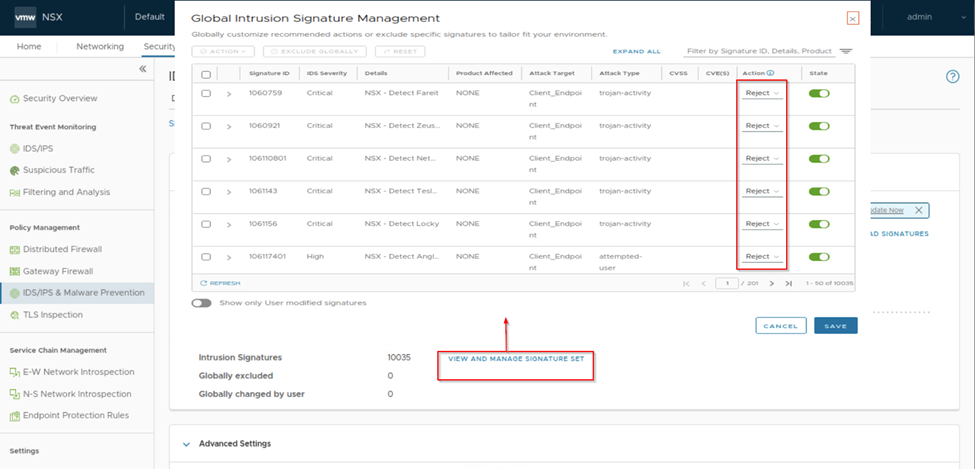
Once we have enabled the IDS/IPS on required cluster we scroll up and select IDS/IPS. We can see that the Signature version status is success. We can observe intrusion signatures set under it there is the number of signatures 10035 which we can view and manage. If any signature is available, we can upload signatures or we get notified if any new signatures available to update.
Note: We can see that current version it shows the last time and date it updated the signature, and the auto update is not enabled here as its lab, we need to ensure that it is enabled in production environment.
Once we have verified, we next move on and click on profile and create a profile, provide a name to it and select the intrusion severities based on the requirement by default all are selected. Here we have selected critical, high, and suspicious severities and then saved it.

Now we will create a distributed rules for the intrusion detection by clicking on distributed rules tab on same page and create a policy and rule under the policy. For demo we have created a rule with source, destination, and services with any and security profile we selected the created profile of IDS/IPS and rest we leave it default. As of now we are doing Intrusion detection we select detect only.
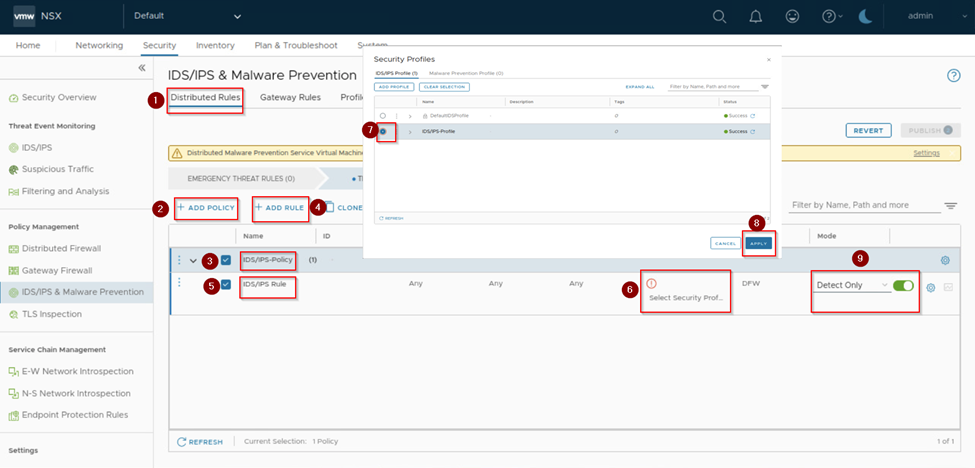
And publish the rule and make sure the mode is success.

Now here from the back end using the rogue PC we will generate a malicious/suspicious traffic towards the overlay VM name sa-web-03. In production it should we automatic. Here for demo, we have generated the traffic. Then we go and verify the Threat event monitoring and see whether the traffic is getting hit and listing the severities. It takes some time to generate the event, we wait and refresh the page.

We can scroll down on same page and expand the impact score and view the full event history of the attack been detected. On below capture we can see that attack has been detected only. Reason as we have created detect only rule.
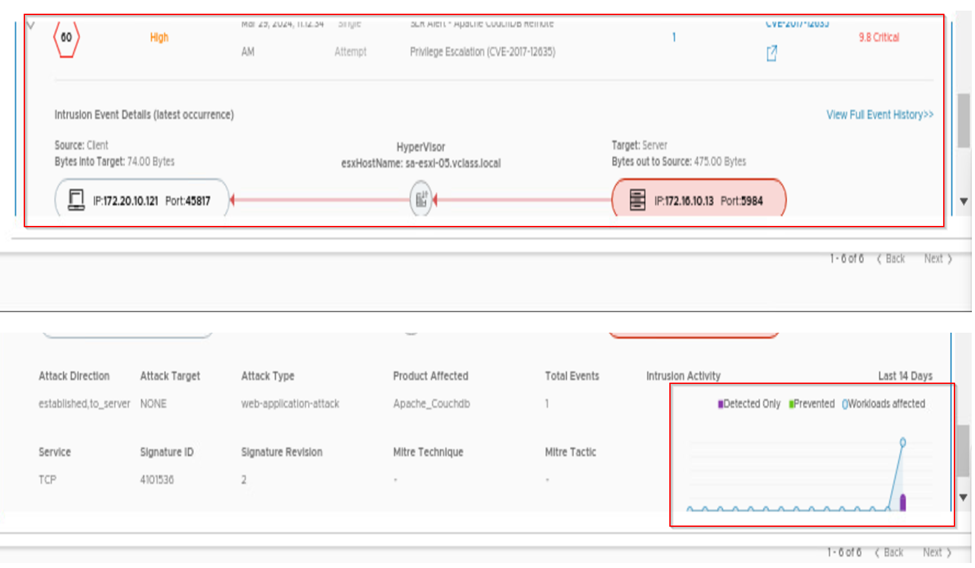
When we click on view full history we see the complete details of the attack like signature id, severity and action taken for the attack. As our rule mode is detect only in intrusion history, we can see the action raised will be alert only.

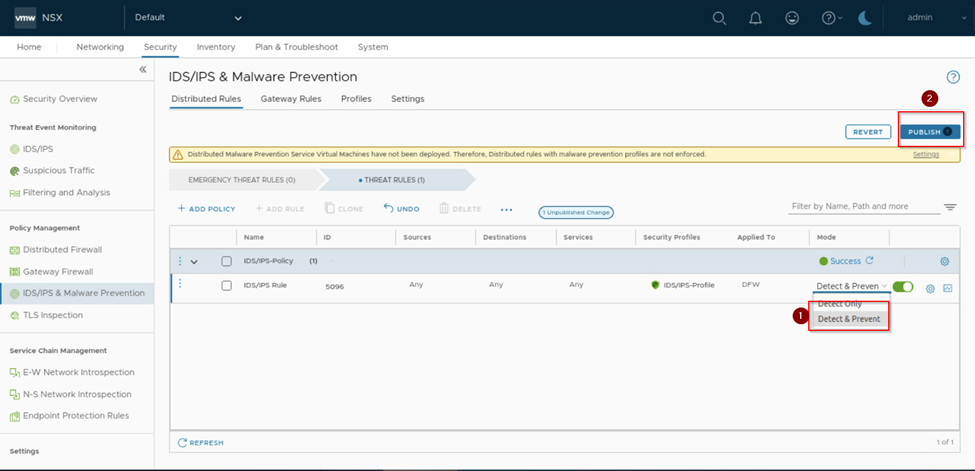
Till here we saw the intrusion detection as we had created the rule with mode detect. Let’s proceed further and do the change on the existing rule and change the mode to detect and prevent as in below capture and publish the change.
Now we go to the settings tab and verify the existing signatures action are set to reject, by default those all signatures will be in reject. As we see in below capture.
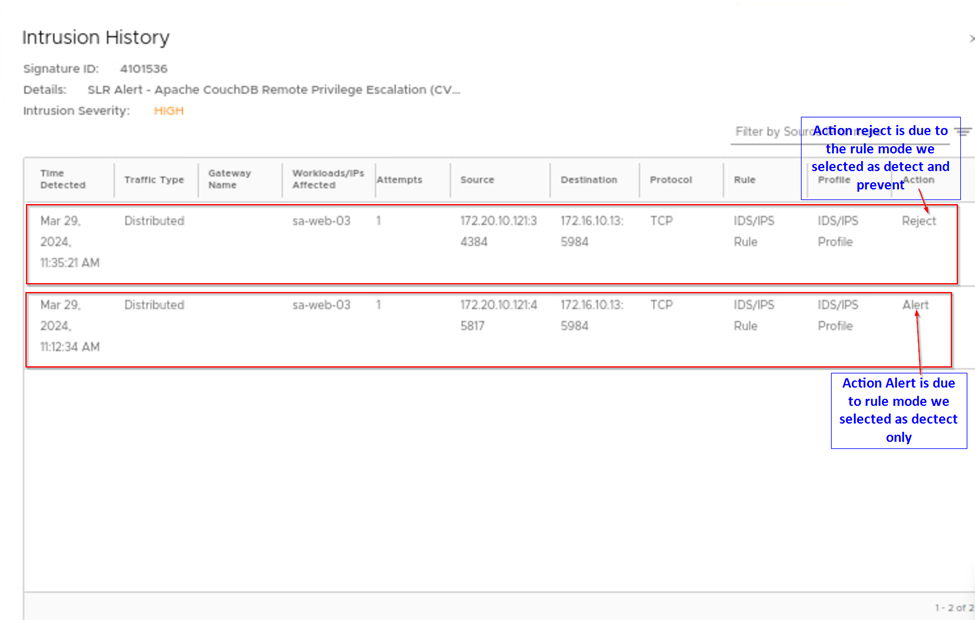
Once we verify it we are all set and see if any malicious traffic comes it will be detected and prevented as well. Here in back end we have generated the malicious and suspicious traffic from rogue PC and on NSX we can see the events under the threat event monitoring. Below are the captures for your references which shows the detected and prevented attacks from the rogue PC.
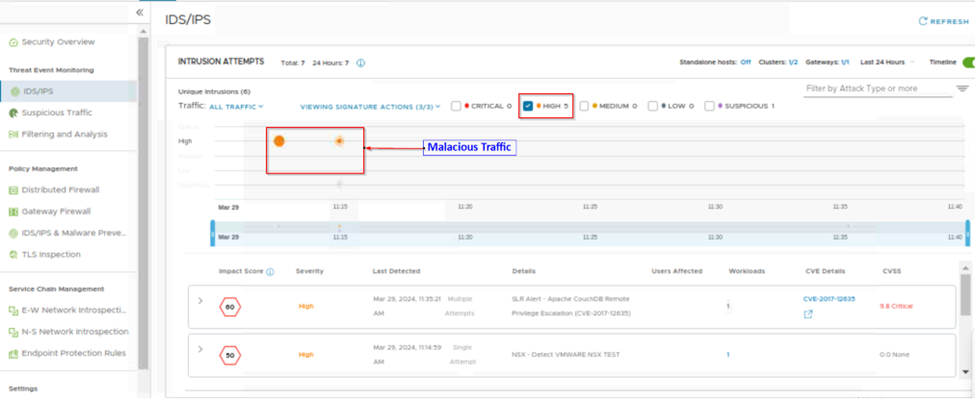
Here we have filtered the traffic by selecting only high and then we can observe the malicious traffic. On same page we scroll down and then expand the listed impact score and observe that the traffic is detected and prevented.

Review the configuration on ESXi
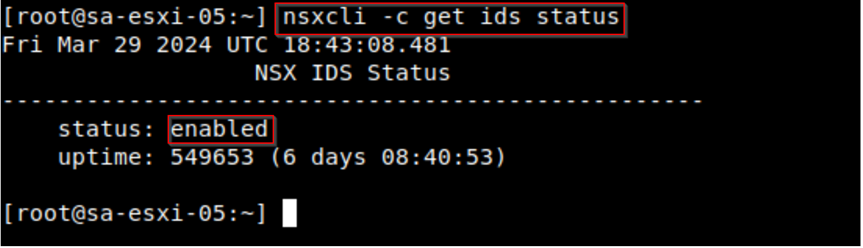
Login to the ESXi for which the IDS/IPS is enabled and provide the command “nsxcli -c get ids status.”
The status should be enabled.
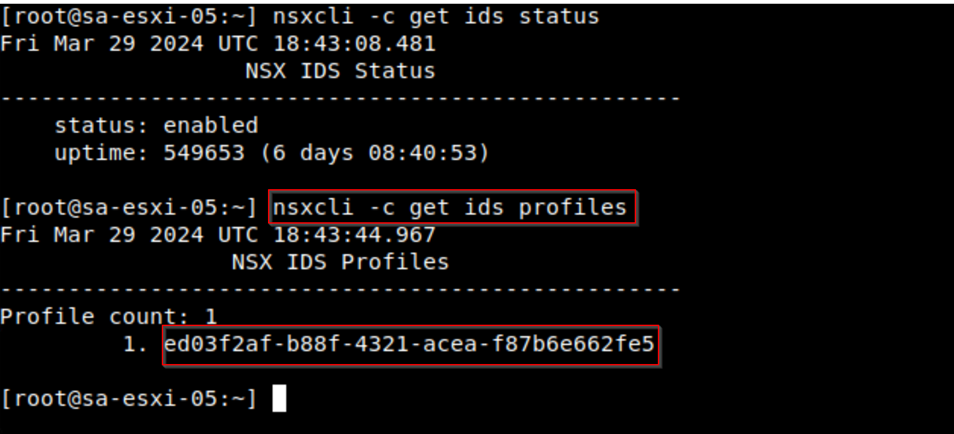
Now let’s check the profile what we have created is been reflected on the ESXi.Provide the command “nsxcli -c get ids profiles”. This command will provide the UUID of the profile.
To verify the VM are having the rule/filters applied.
Provide the command to list the NIC slot on which rule is applied “summarize-dvfilter | grep -A9 <VM Name>”.

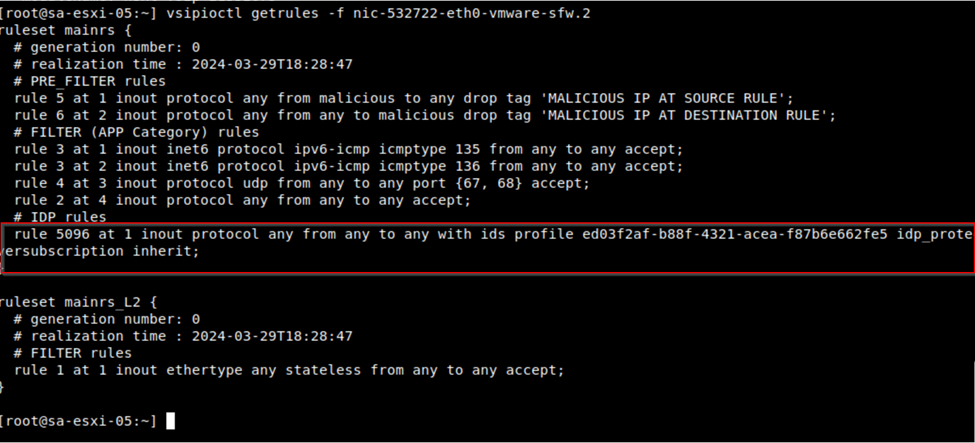
Using the vNIC slot name we list out the rules applied to the VMs by giving the command “vsipioctl getrules -f <vNIC slot vfilter-name>”.
Conclusion
We setup the IDS/IPS on one of the cluster, created the profiles and configured the distributed rule for intrusion detection by selecting detect only mode, later we analyzed the traffic and then changed the same rule mode to detect and prevent and analyzed the traffic and compared the difference of Intrusion detect and intrusion detection/prevention.
Later we went through the CLI of ESXi and checked the configuration of IDS/IPS on it and verified VMs running on that cluster which are enabled for IDS/IPS. How do we check the rules/profiles for specific VMs.
Please follow the best practices and pre-requisites before implementing the IDS/IPS as it might impact the production.
I hope this topic will be helpful and informative to you all. If you have any specific concerns or questions, please let me know and I’ll do my best to address them.
Signing off until next blog happy learning.
Below is the Reference Links,
https://docs.vmware.com/en/VMware-NSX/4.1/administration/GUID-93080CF0-B798-4507-9507-12CA19F85F80.html

Leave a comment