In today’s virtualized data centers, storage plays a crucial role in ensuring high availability, reliability, and scalability. VMware’s vSAN (Virtual SAN) solution is a software-defined storage solution. It simplifies the management of storage. It integrates seamlessly with VMware’s vSphere environments. Among the key configurations within vSAN are OSA (On-Demand Storage Architecture) and ESA (Elastic Storage Architecture). Each offers unique benefits. These benefits depend on the use case.
In this blog, we’ll explore the concepts of vSAN OSA Single-Site Clusters. We will guide you through the setup process with lab steps. These steps will help you set up these clusters. Capable of supporting three to sixty-four hosts per vSAN cluster.
What is vSAN OSA ?
vSAN OSA (On-Demand Storage Architecture)
vSAN OSA is designed to offer a flexible and on-demand approach to storage in a software-defined architecture. It lets you pool resources from different nodes, like compute and storage, in the cluster. This setup provides centralized storage for virtual machines (VMs) in VMware environments. The OSA architecture is particularly useful for organizations seeking high performance, resilience, and scalability.
vSAN cluster requires the next basic hardware resources per each host:
- Certified compute node
- 32 GB RAM
- Dedicated 1 Gbps NIC for hybrid configurations
- Dedicated or shared 10 Gbps for All-Flash configurations
- At least one SSD for the cache tier
- At least one SSD or HDD for the capacity tier
vSAN OSA and ESA Single-Site Cluster: What’s the Difference?
- vSAN OSA (On-Demand Storage Architecture):
- Designed for high-performance workloads that need consistent throughput and low latency.
- Utilizes a single-site setup to pool storage resources from multiple physical hosts.
- Ensures high availability within a single site. It distributes data across nodes. It includes resiliency features like RAID 1 or RAID 5.
- vSAN ESA (Elastic Storage Architecture):
- Tailored for environments where elasticity and dynamic resource allocation are needed.
- Provides high scalability by allowing storage to grow and shrink automatically based on workload demands.
- Suitable for cloud-native applications and environments requiring high adaptability.
Why Use vSAN OSA and ESA Single-Site Clusters?
- Scalability: Both OSA and ESA allow you to scale your storage capacity in a single-site cluster. You do not need to worry about complex network configurations or external storage devices.
- High Availability: These clusters offer built-in fault tolerance. This ensures applications stay available even if a host fails.
- Performance: Both architectures are optimized to support high-performance workloads with low latency, especially when deployed in SSD-based storage environments.
- Cost-Effectiveness: With no reliance on physical SAN or NAS devices, vSAN reduces hardware costs and simplifies IT management.
Lab Steps: Setting Up vSAN OSA and ESA Single-Site Clusters
Now that you understand the core concepts of vSAN OSA, it is time to continue. Let’s walk through the steps for setting up a Single-Site Cluster in a VMware environment.
Prerequisites:
- VMware vSphere (vCenter Server and ESXi hosts)
- A least of 3 ESXi hosts (for a highly available cluster)
- vSAN licensing and configuration access
- Network connectivity between all nodes in the cluster
- Shared storage (SSD or HDD) for use by vSAN
- At least one virtual network for management and vMotion
Lab Setup for vSAN OSA Single-Site Cluster
Step 1: Prepare the ESXi Hosts
- Install VMware ESXi on each physical server.
- Make sure that each host has local storage (SSD or HDD) configured and is visible from the host’s storage configuration.
- Verify network connectivity across all nodes to confirm they can communicate with each other.
- Make sure that vCenter Server is installed and accessible to manage the ESXi hosts.
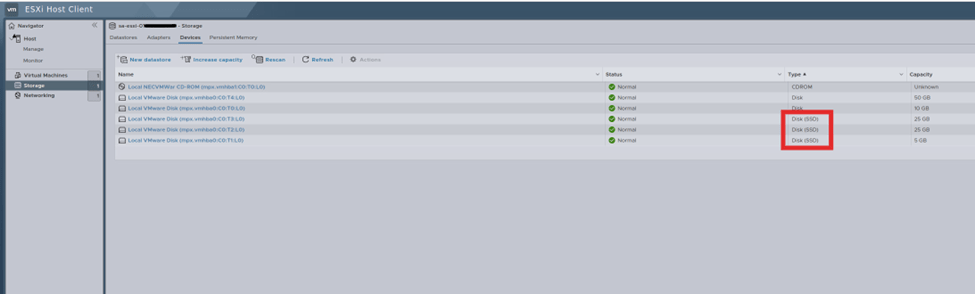
Here we are using 4 hosts for configuring the OSA vSAN cluster. Below are the snapshots that show the ESXi and vCenter deployed and configured with version 8.0.2.
ESXi with the storage disk with SSD for cache tier and capacity tier
vCenter and ESXi with management network only configured, vMotion and vSAN network will be configured in upcoming steps.

Step 2: Turn on vSAN on the Cluster
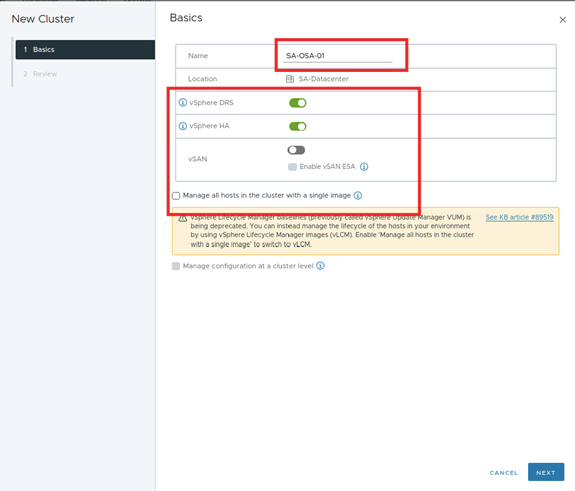
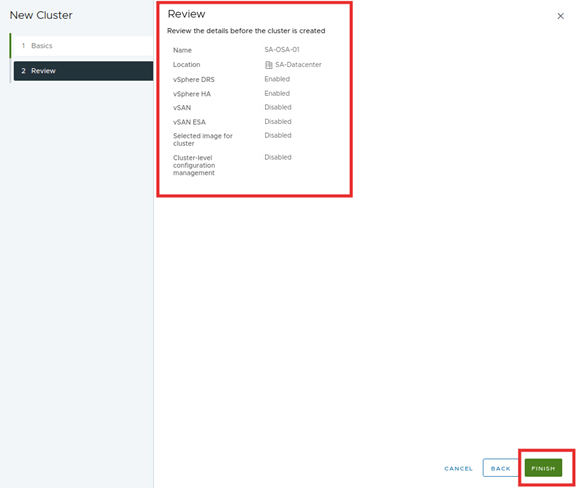
- In vCenter, create a new cluster or use an existing cluster. In the New Cluster window, turn on vSphere DRS, vSphere HA, vSAN, and deselect the Turn on vSAN ESA checkbox. Deselect Manage all hosts in the cluster with a single image checkbox. Review the details and click FINISH.

- The cluster is created. It takes us to a quick start step under the setup tab. This process makes us set up the vSAN.
It has 3 steps first step is completed while creating the cluster.
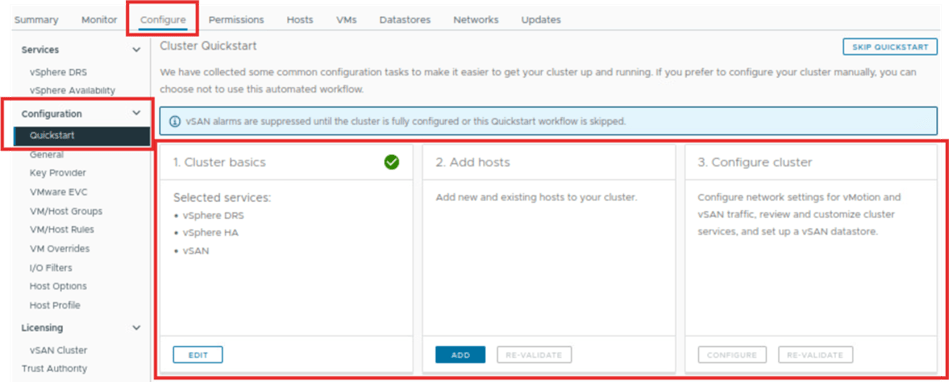
Second step we will add the hosts in the created cluster. We can add the new host or existing host which part of your vCenter and not part of any cluster.

Here we will us the existing host.
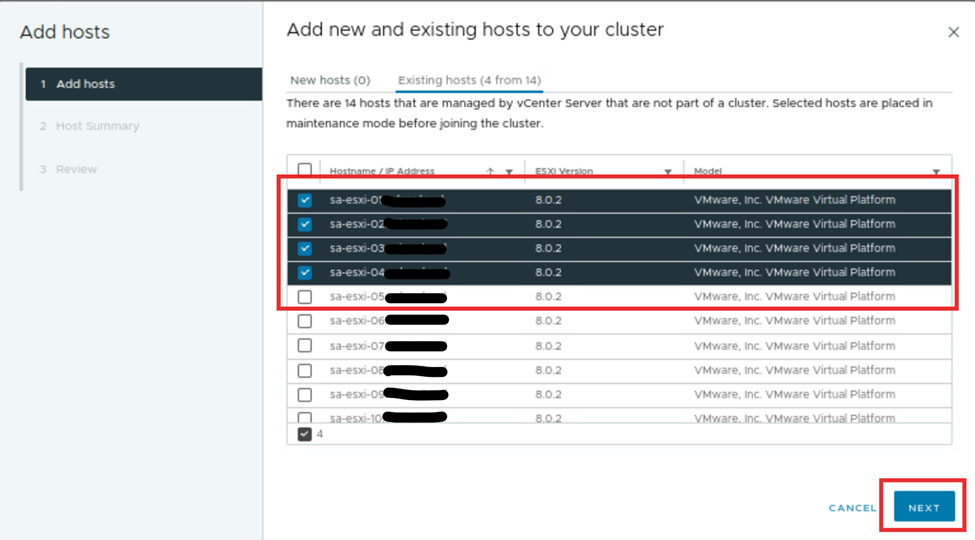
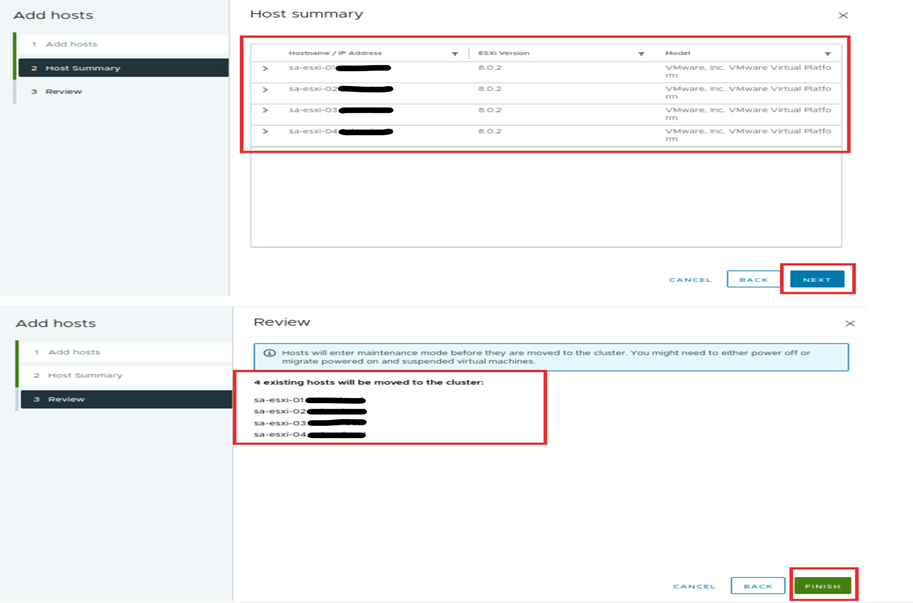
Then hit next. This action will show the selected host. Next, review the host. They will be added to the cluster. HA,DRS and respective configuration will be applied to the hosts. We had done this in step 1 while creating the cluster. Click finish.
Now the host are added to new cluster they will be in maintenance mode. We see that steps 1 and 2 are marked. They have a green tick on the quick start page of the setup tab of the cluster. If any alerts seen make sure those are taken care of before we go to the third step. If those are not critical, we can ignore them and continue. Here we see the SCSI controller warning which we can ignored.
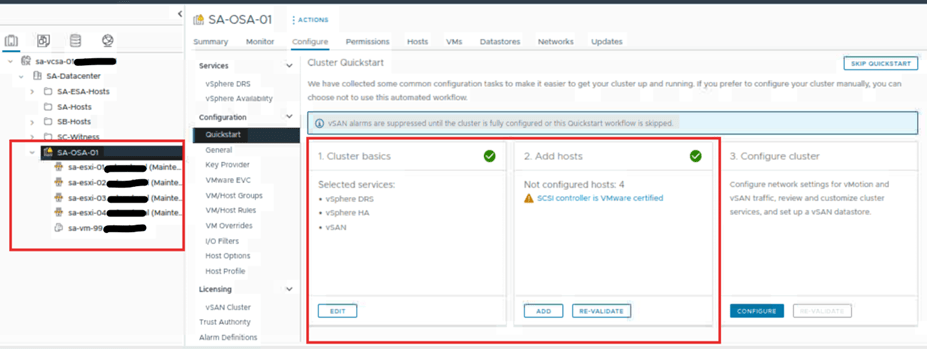
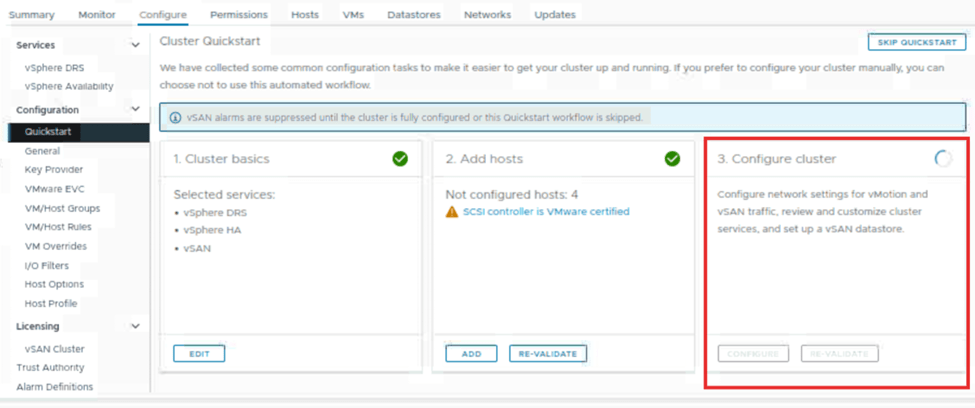
Once we have completed first 2 steps. Click on set up on third step arrange cluster.

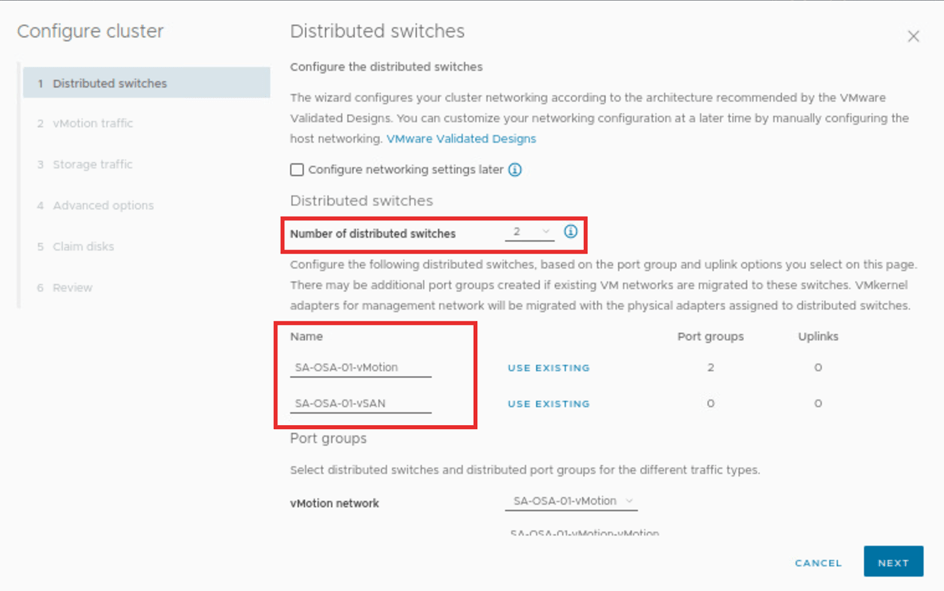
Here we will set up the network settings i.e. number of distributed switches or if we want to set up this network settings later, we can do. Nonetheless, if later choice is selected in this step, no distributed switches will be created. Port groups or vmkernal adapter will not be created, and no physical adapter will be migrated.
Here we will set up the distributed switches. We will select the number of switches to 2. Then we update the name. One is for vmotion, and another is for the OSA vSAN.
Scroll down on same page and update the vmotion and vSAN distributed switches port groups respectively.
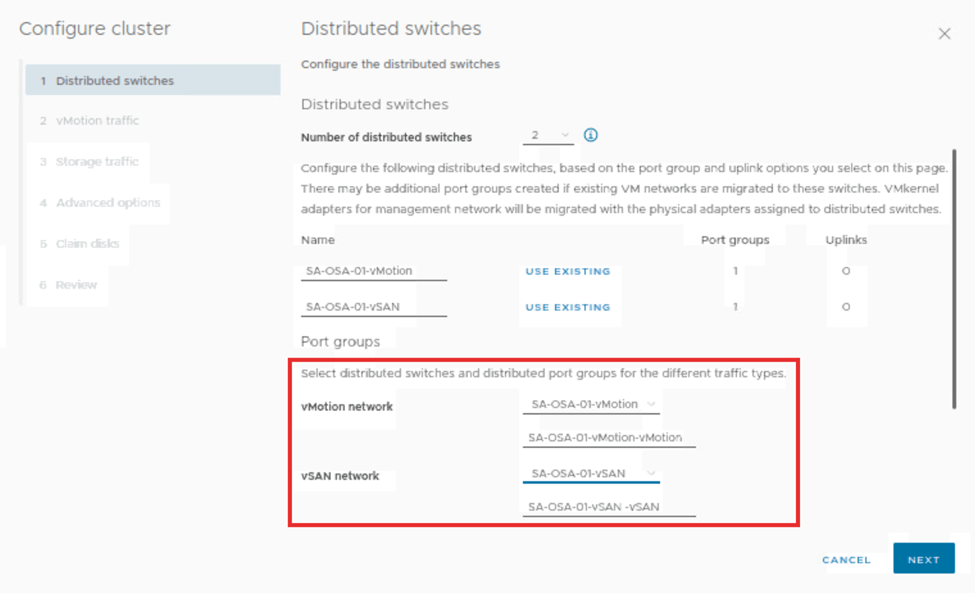
Scroll down on same page and update the adapters for the vmotion and vSAN distributed switch. Then click on next.

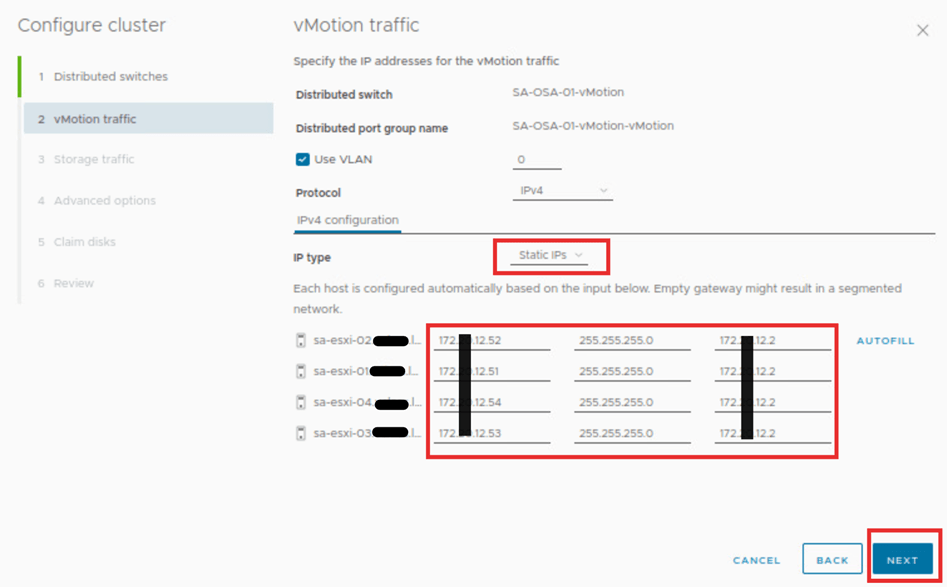
On this page we will provide the vMotion traffic details based on the requirements. In this case we will select the IP type as static, and rest will be default. When the order of the host is aligned, provide the first IP entries. Then hit autofill. If not, provide the details manually. Then click next
On this page we will give the Storage traffic details based on the requirements. In this case we will select the IP type as static, and rest will be default. When the order of the host is aligned, supply the first IP entries. Then hit autofill. Otherwise, offer the details manually. Then click next

On this page we see advanced options for HA, DRS, vSAN & Host Options and Enhanced vMotion Compatibility. Here we will explore the vSAN Options like mentioned below
-Deployment type (Single Site, Two-Node, or Stretched Cluster)
-Data-at-Rest encryption
-Data-In-Transit encryption
-Space efficiency (Compression Only or Deduplication and compression)
-Fault domains
-RDMA support (Requires RDMA capable network adapter)
Here we will accept the default advance options as we are configuring single site cluster and click next.

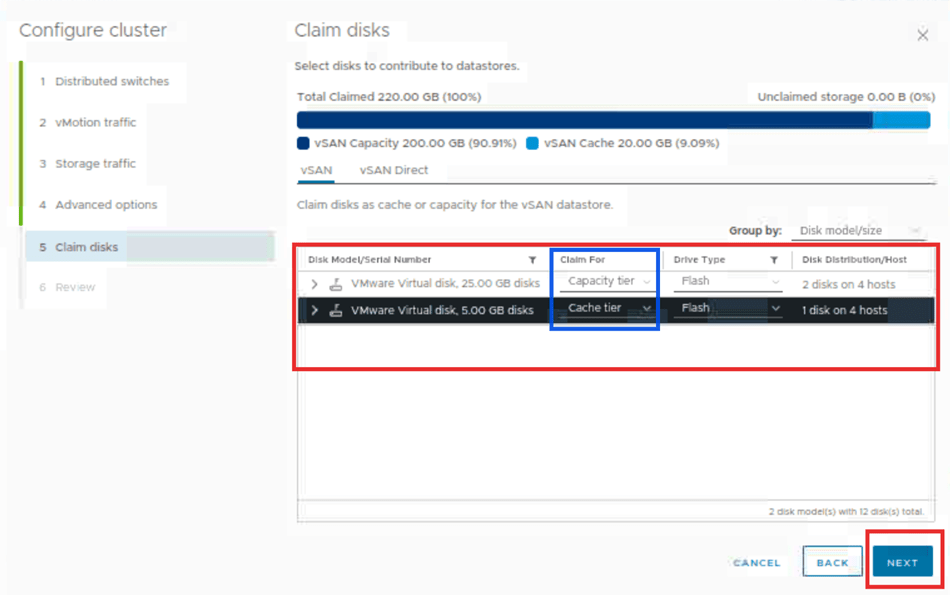
On this page we can notice claimed disks. We need to verify that the disks with higher GB should be capacity disks. Here they are 25 GB with two disks per host. The cache disk with lower GB should be verified as well. Here it is 5 GB for one disk per host. Verify it and then click next.
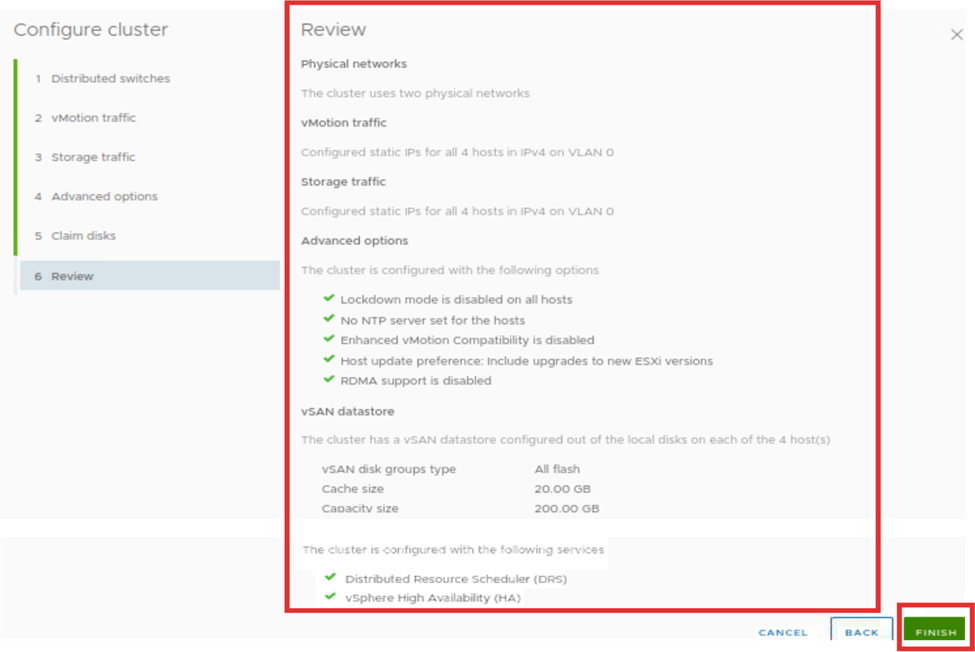
On this page we will review the configuration done on the earlier tasks and then click finish.
Once we review the configuration and click on finish, the setup cluster step appears in progress. This happens on the configuration quick start tab. This step will build the cluster for vSAN. The time it takes depends on the number of hosts in the cluster.
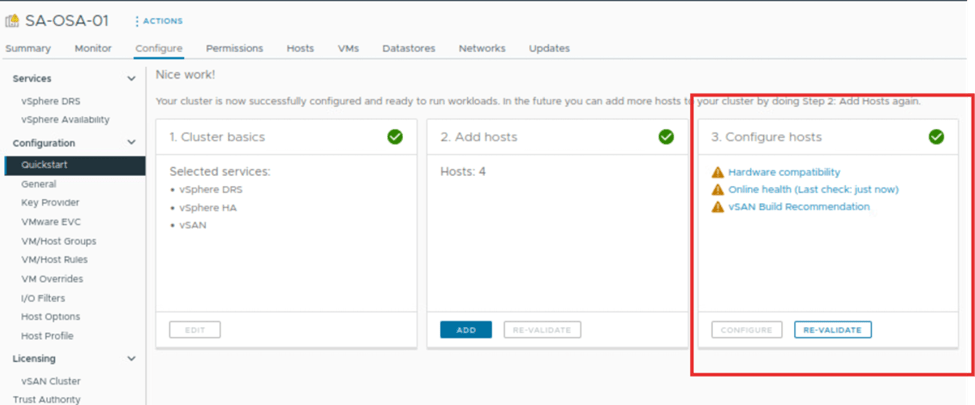
Once the vSAN cluster is formed, we can see the configure cluster is marked as completed. The configure option is grayed out. We can revalidate the cluster and, we can see some warnings under it related to the vSAN services. Which can we fixed based on requirement.
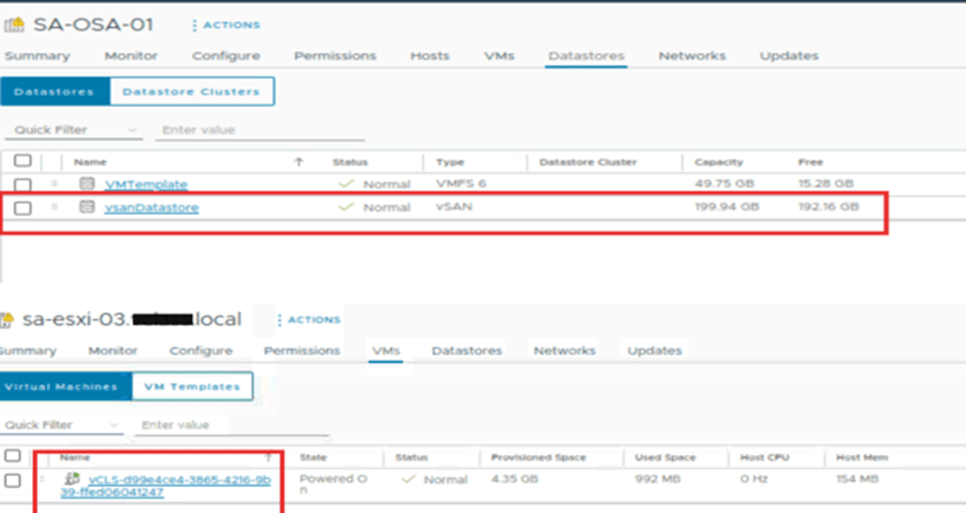
Along with this, we can notice the host are out of the maintenance mode. On the host VM tab, we can see vCLS VMs are powered on. On the cluster datastore tab, one vSAN datastore has been created with a capacity of approximately 200 GB.
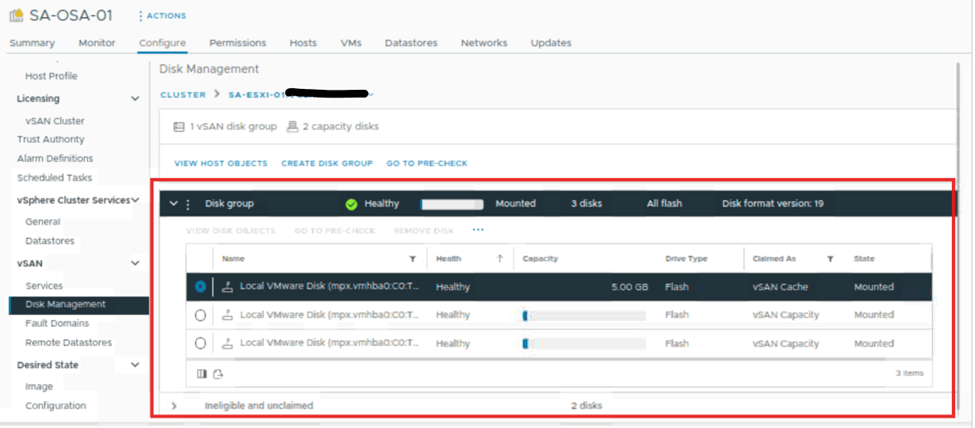
On cluster set up tab look for vSAN and under that select disk management. Here we can see the number of hosts that are part of the vSAN cluster. We can also see the health status of the disk on each host, the disk in use, and other information.
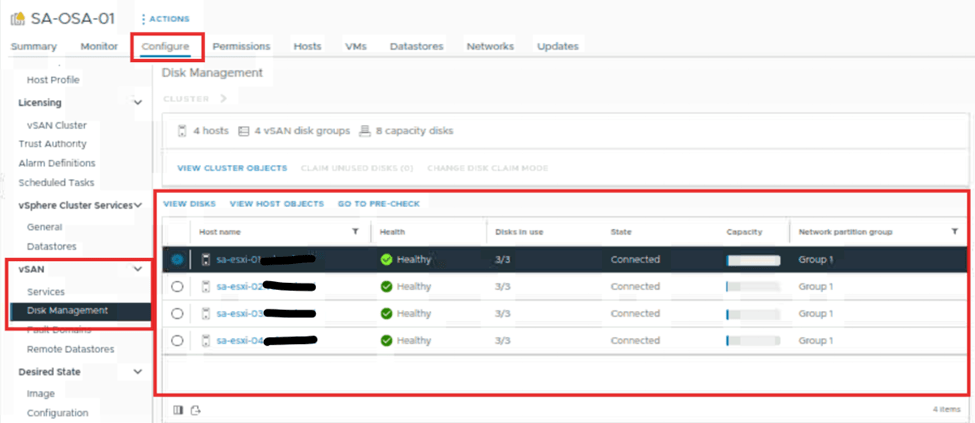
On the same page select any one host and click on view disks. New window will open on same page. We can observe the disk group. Expand it, and we can see the capacity and cache disks for that host. These disks’ status is also visible.
Let’s login into one of the ESXi CLI instances. Then, run some commands. We will see the details related to the vSAN on it.
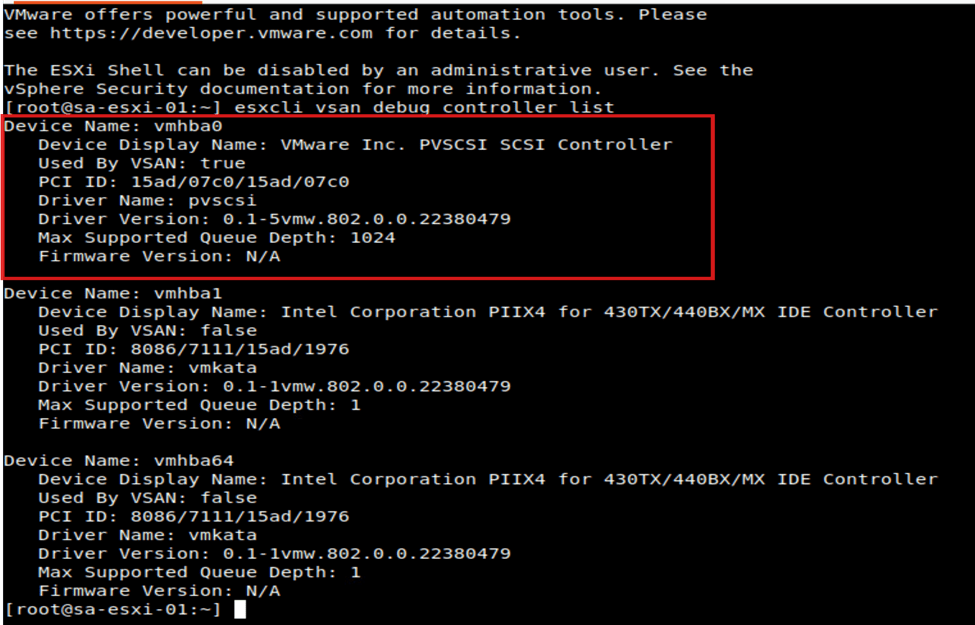
Access ssh on ESXi and execute the command to verify the vSAN controller used. Check which controller is being used and related details of it.
Let us verify the network switch. We configured it during the vSAN configuration. We can do this by running the command “esxcli network vswitch dvs vmware list | less”.

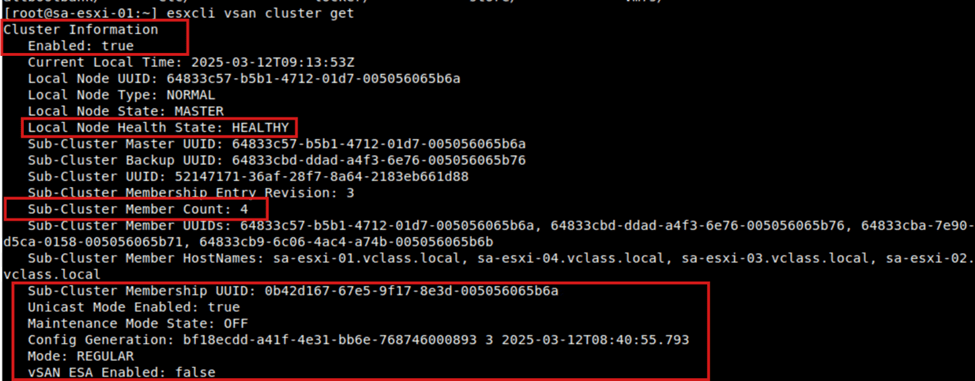
Let us check the cluster of the vSAN. We need to check the cluster status. We should also find which host is master in the cluster and the other hosts as members. As we are configuring the OSA type vSAN we can see the ESA type is false.
Testing and Validation
Once the cluster is set up, you can perform several tests to validate the configuration:
- Allover Testing:
- Simulate a host failure to ensure that VMs are correctly migrated to other hosts in the cluster with minimal downtime.
- Performance Benchmarking:
- Run benchmark tests on storage performance (e.g., IOPS, throughput, and latency) to validate that the architecture supports your expected workloads.
- Elastic Scaling (for vSAN ESA):
- Test the elastic scaling feature by simulating changes in workloads and observing how the cluster adjusts storage capacity accordingly.
Conclusion
vSAN OSA and ESA Single-Site Clusters are powerful storage solutions. They offer scalability, high availability, and flexibility for modern virtualized environments. vSAN OSA is used for high-performance, fault-tolerant workloads. vSAN ESA is tailored for dynamic, cloud-native applications. Both architectures provide seamless integration with VMware environments.
Follow the steps outlined in this blog. You can successfully configure a vSAN OSA or ESA Single-Site Cluster. This will meet the needs of your organization. This configuration optimizes storage while reducing complexity and costs.
The future of storage is software-defined. With vSAN, you are poised to unlock the full potential of your virtualized infrastructure.
I hope this part 1 will be helpful and informative to you all. If you have any specific concerns or questions, please let me know and I’ll do my best to address them.
Signing off until next blog happy learning.
Below is the Reference Links,
https://techdocs.broadcom.com/us/en/vmware-cis/vsan/vsan/8-0/vsan-planning/creating-a-virtual-san-cluster.html
Tags: cloud, nsx, technology, vmware, vsphere

Leave a comment