Based on VMware technologies, this site likely provides information and learnings related to software-defined data centers.VMware NSX for network virtualization for IT professionals and organizations using VMware products to optimize their infrastructure, enhance security, and streamline operations.
The aim of NSX Intrusion Detection and Prevention Service (IDS/IPS) is to monitor network traffic on hosts and edges for malicious activity by comparing it against a known set of signatures.
The NSX IDS/IPS monitors network traffic on a host for suspicious activity by comparing the traffic against predefined signatures. Each signature defines a pattern for a specific type of network intrusion that must be detected and reported. Upon finding a matching traffic pattern to a signature, a predetermined action is triggered, such as generating an alert or blocking the traffic from reaching its intended destination.
IDS can be implemented in two methods,
Knowledge-based Signature: These signatures are known by which we can detect malicious instruction sequences specified in the signatures. Hence this method is limited to attacks that are already known. It does not cover the zero-day threats.
Behavior-based detection: In this method the detection is behavior based. The events which are called informational or info and consists of events that pinpoints the unusual activities in network that are not malicious but provides information while investigating a breach.
Pre-requisites:
To use IDS/IPS on NSX-T we should have the licenses of Threat Prevention. To know more about licenses check here.
We make sure for IDS/IPS NSX Edge VM is deployed with at least large form factor.
Considering the above pre-requisites. Let’s begin the configuration of IDS/IPS.
Configuring/Enabling IDS/IPS
Login into NSX and navigate to Security –> Policy Management–>IDS/IPS & Malware Prevention.
Hey, all welcome back, hope you may have gone through the first 3 parts of the migration process, if not here are the part-1, part-2 and part-3a blogs for reference.
Small overview from previous blogs,
1. Verification of the NSX-V environment for migration readiness. 2. Deployment of the NSX-T appliance with compatibility considerations. 3. Creation of uplink segments and configuration of the uplink profile with a teaming policy for the edges. 4. Deployment of the edges and integration with NSX-T manager. 5. Conducting a ping test between Edge TEP and NSX-V Host VTEP. 6. Establishment of T0 and uplink configuration with BGP neighborship. 7. Added NSX-T account on vRA. 8. Created the migration plan on vRA and added it in to Maintenance Mode (MM). 9. Generated the .json file and saved it on system. 10. Enabling the migration service on NSX-T. 11. Overview on the different type of migration modes and its types. 12. Understood 2 methods of migration In -place and In-Parallel migration. 13.Started migration workflow and stopped at migrate edges.
This blog part-3b will explore and resume the further flows of migration. Its is continuation for previous blog part-3a. where we paused at check realization L3, L4-L7 services migration flow.
So, let’s resume our sub step-3b Edge Migrate, Host Migrate and then removing of vRA out of MM by providing the mapping file from NSX-T after host migration flow.
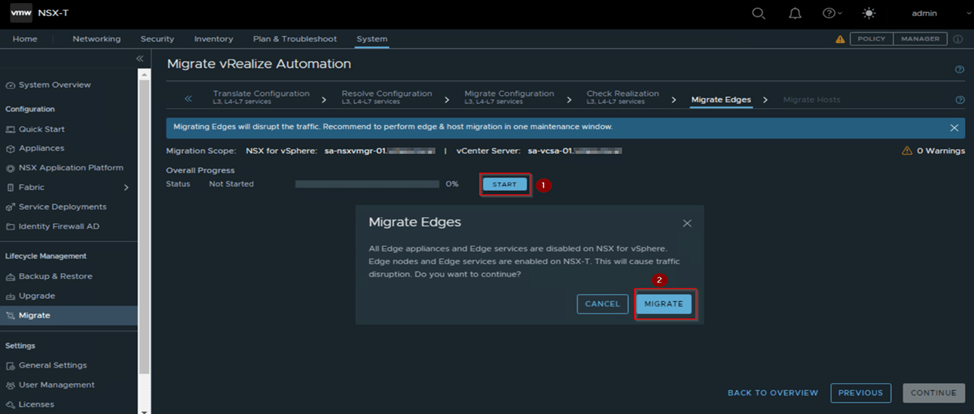
Migrate Edges: In this flow the edges will be migrated and the data traffic which is going via NSX-V will be shifted to NSX-T. Till earlier workflow there was no impact on the environment. However, this workflow there will be traffic disruption. It is recommended to carry out this workflow and the next workflow in single Maintenance window.
Run a continues ping test to workloads and click start flash prompt will occur saying that all edges and its services will be disabled on NSX-V and NNSX-T edges and its services will be enabled click to migrate.
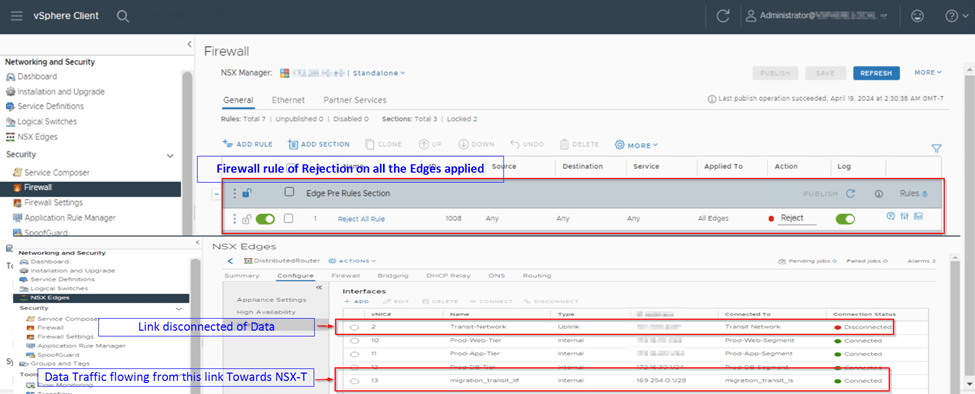
In the flow we can observe that on NSX-V a default reject rule will be applied on edges and published on NSX-V side and on edge DLR which we had selected in Define topology that interface gets disconnected, and all the data traffic will be flowing via Migration Transit link which is present and created on NSX-V and NSX-T by the tool towards NSX-T edges.
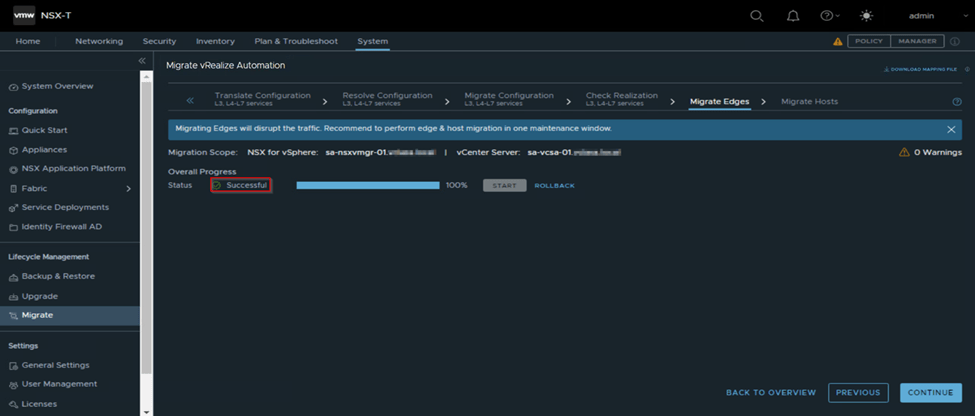
Once the Edge migration show the overall status as successful as we see in our capture below, if edge migrate fails we do the troubleshooting by looking into migration logs and fix the issue to make sure the traffic is flowing from NSX-T and data traffic is restored. If its not fixed we collect support bundle of manager and raise ticket with VMware and then rollback edge migrate workflow making it sure that the data traffic is restored and flows back from NSX-V side.
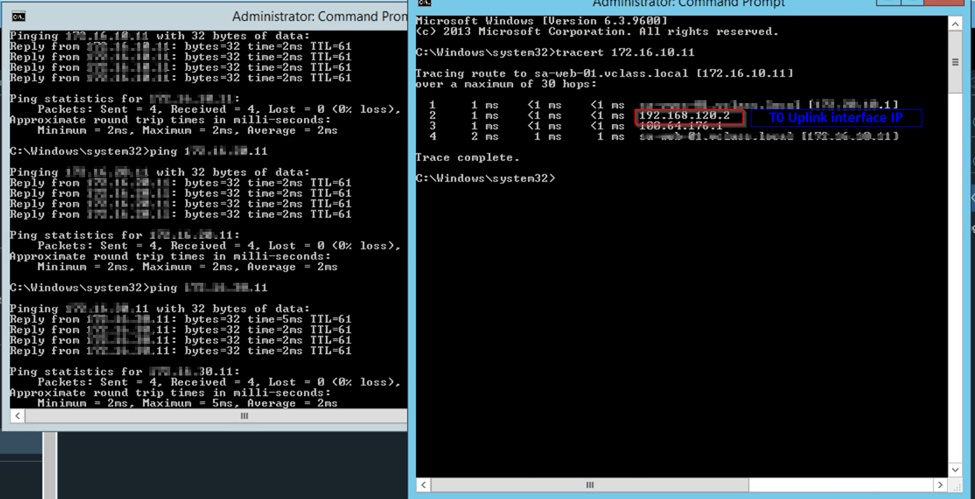
If edge migrate is successful. We check all the workload application are reachable and everything is working seamless by doing ping test and trace route or access the application using the segment of NSX-T environment. Below are some captures from our environment for reference. We make sure once edges are migrated take confirmation from the application owners that everything is working fine then we proceed with final workflow of NSX Migration which is host migrate by clicking continue.
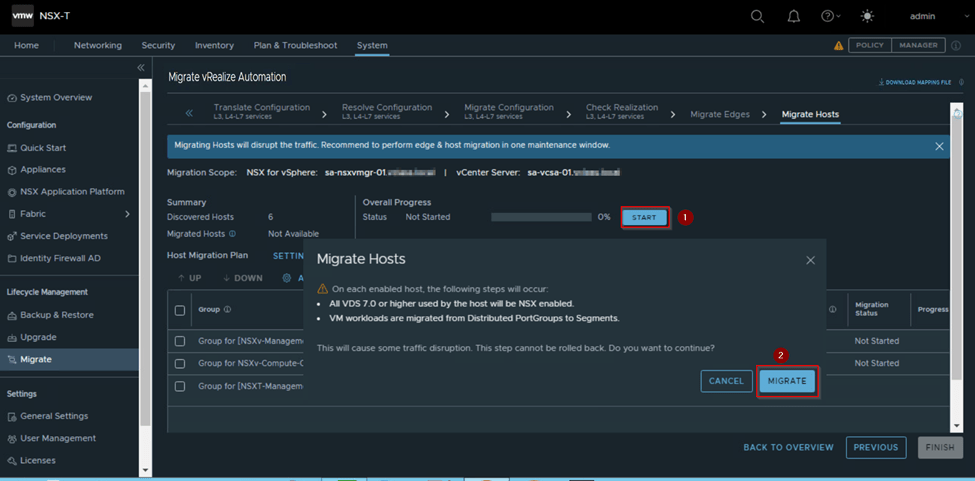
Migrate Hosts:
This is the final flow of NSX migration. Once we have confirmation from workload teams that the data traffic is working after the edge cutover is done. Then in this flow migration of hosts will be carrying out where one host goes into maintenance mode (MM) based on the vCenter DRS configuration. So, we need to make sure that DRS is configured in fully automated mode.
In this flow in each host NSX-T VIBs will be installed and NSX-V VIBs will be uninstalled and then the host will be removed from the MM. Hence till Edge Migrate flow we have rollback option. Host migrate does have roll back option. Therefore, we need to be sure that all the configuration from NSX-V to NSX-T are migrated correctly and then we proceed with Host migrate flow.
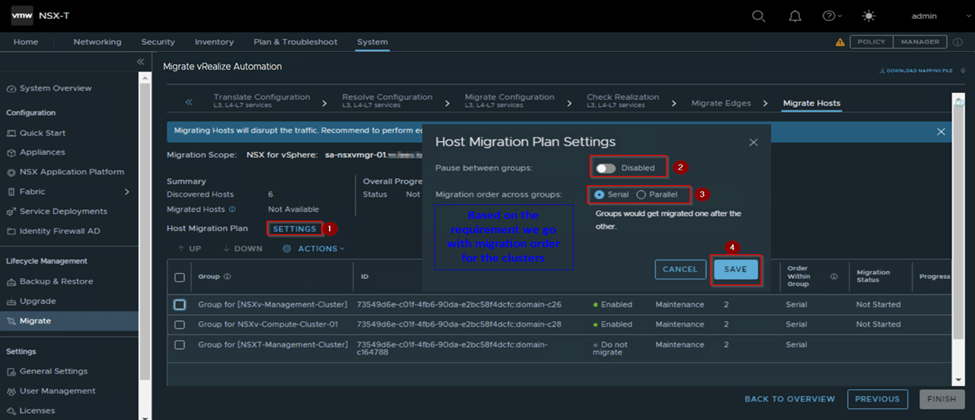
Once we are certain that configuration is in place, which for our environment is, we proceed with host migrate flow, here we have options to upgrade multiple clusters in parallel or in serial, it’s based on the cluster’s storage capacity and number of hosts which can enter in MM along with it we can pause between cluster groups, so that we are confident enough to check the upgrade cluster and resume the migration for other cluster. These settings we can do it on Host Migration plan.
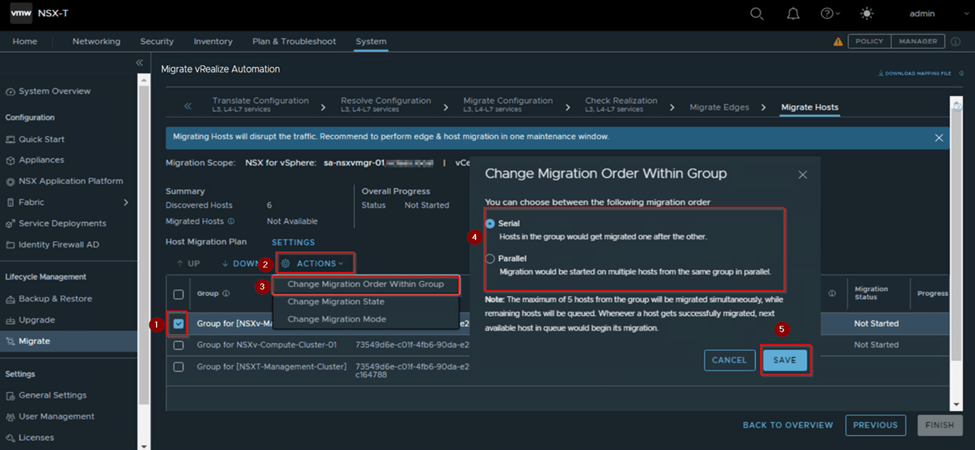
We have more option if we want to do it on specific groups. For that we select a specific group and click on action from the migrate host window and select below option based on the requirement, 1.Change Migration Order within group: This option provides us to migrate host in serial (i.e. one host after another) or in parallel (i.e. Multiple hosts will be migrated in same group in parallel).
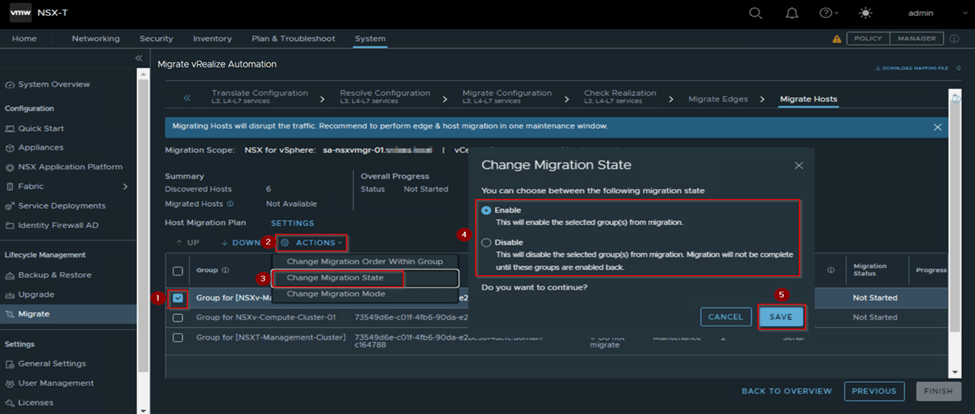
2.Change Migration State: This option gives us the feasibility whether to migrate this group or not by selecting disable or enable for migration. By default, we it will be enabled.
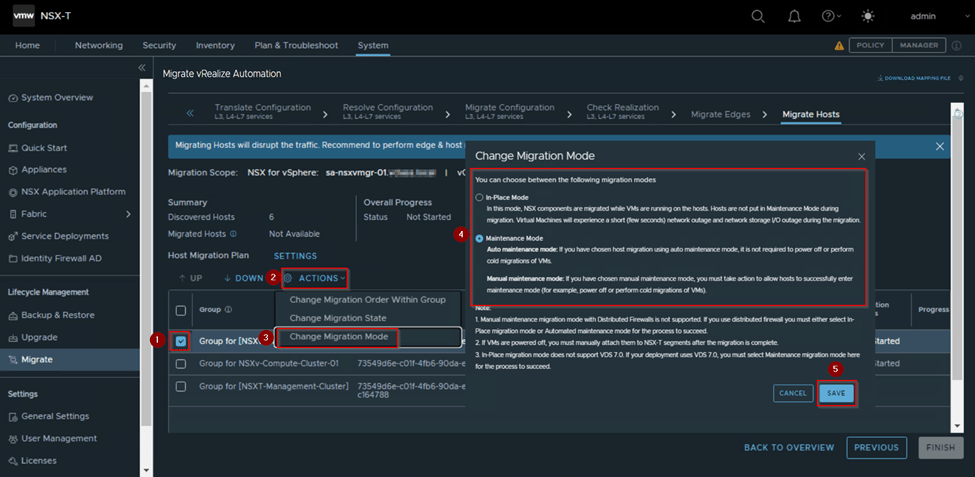
3.Change Migration Mode: This option gives us the flexibility to migrate the host in 2 modes
In-Place Mode: The host will not put in MM during migration, VMs running on the host will experience a short outage during the migration.
Maintenance Mode: It has 2 sub modes. Auto MM: If we have chosen host migration using auto MM, we don’t require to do cold migration of VMs. Manual MM: If we have chosen manual MM, we are responsible for taking action to allow the host to enter in MM.
We need to select this option based on requirements as it has pre-requisites which needs to be met or continue with default option.
Here in our environment, we have selected the default option, like migration plan is serial, where one host will be migrated one after the other in a group and once one group is completed the other groups host migration will start and have not paused the migration the group migration is completed.
We click start and wait for the overall progress to complete successfully. This will take time depending on the number of host and clusters we have in the environment and uptime taken for the host to come online after NSX-T VIBs installation.
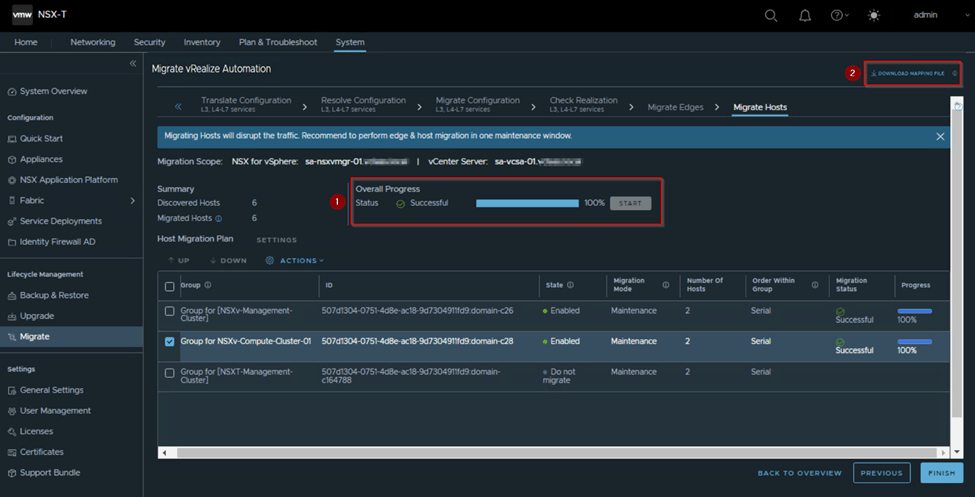
Once we have completed host migration which should get completed without any challenges. If any challenges seen and host migrate fails, no impact on the environment only that host will be down in cluster, we need to fix the issue and then give a re-try.
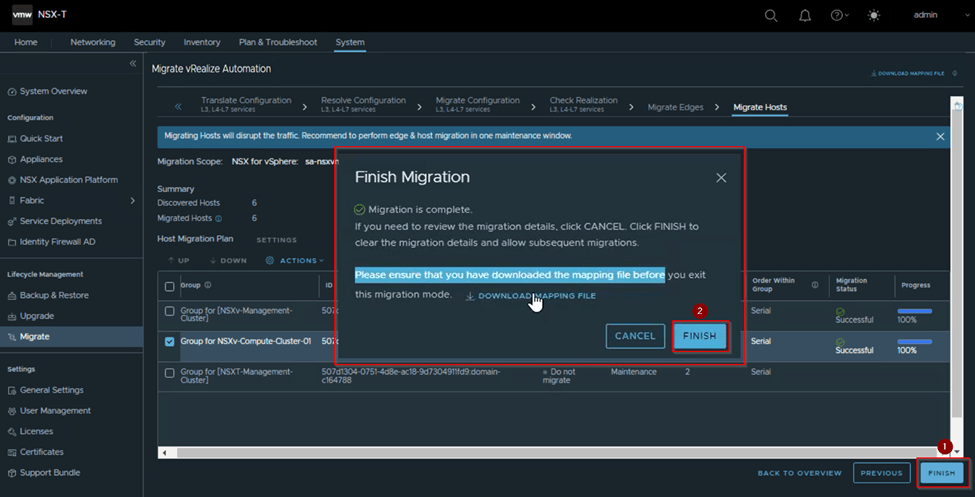
In our case we have completed the host migration successfully. Now we will not hit finish, as its vRA integrated environment, and hope we remember we had paused the vRA after download of. JSON from.
So, on Host migrate workflow window on top right side we see download mapping file as per below capture, that file we need to download via which we will be able to resume the vRA task and take it out of Maintenance Mode.
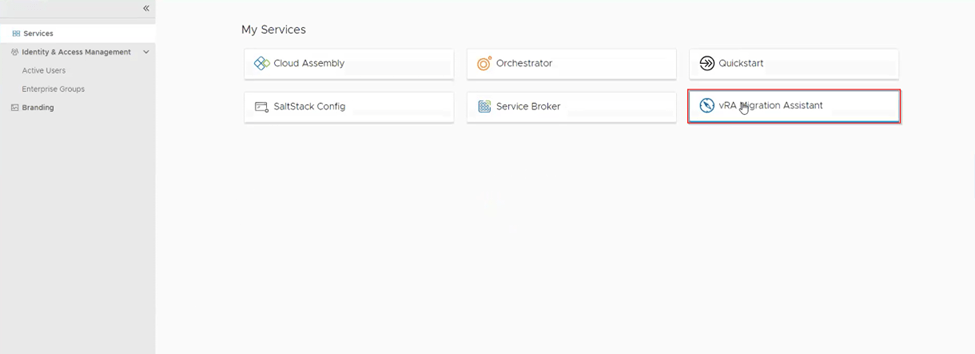
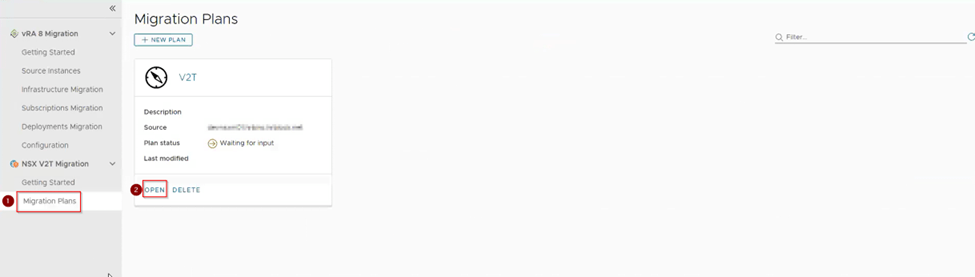
Now we move towards the vRA UI and resume the migration on it by logging to vRA and access the vRA migration assistance and opening the migration plan which we had created and paused by clicking open.
Here we will be redirected to the step 4 NSX- Migration where we will click import and select the downloaded mapping file form NSX-T.
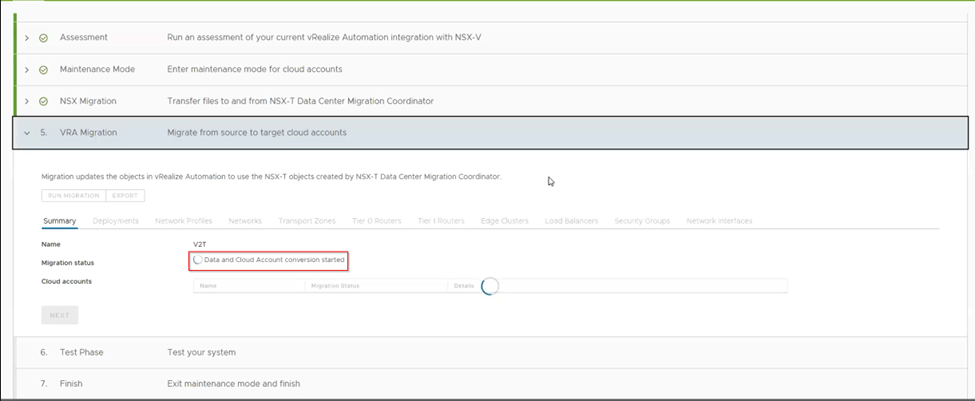
We wait for the import to complete successfully and then click next which will take us to step 5 vRA Migration.
As we click next the vRA Migration step is running and we can observe the status as shown in below capture
Once we see the migration status as enumeration status as completed, and cloud account migration status as successful (NSX-V and NSX-T cloud accounts). We need to check all the tab and verify all the configuration is replicated as it was when vRA was using NSX-V.
Once we are confirmed and checked the configuration are migrated. Then we click next to the next step Test phase.
Here in this step, we use the blueprint to deploy the VMs and check all the necessary components are used from NSX-T like the segment and Tier-1 are created and attached to Tier-0 and the network is reachable for the newly developed VMs from the vRA and try to migrate the VMs from one host to another and make sure they are pingable and accessible.
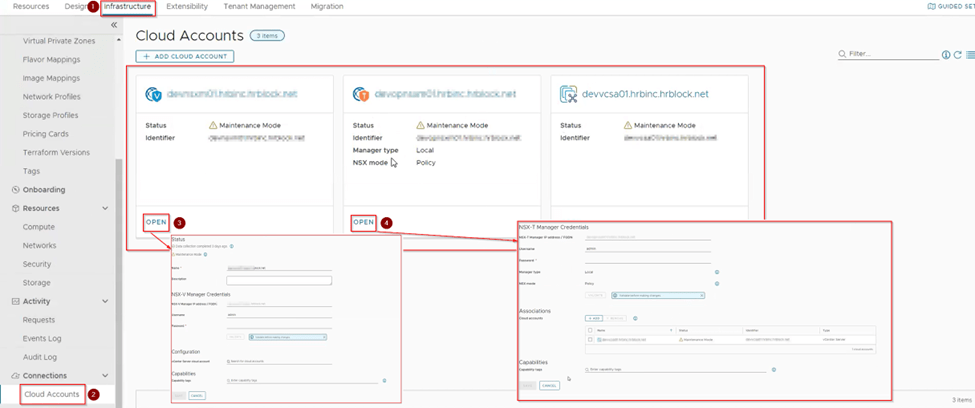
Also, from vRA check the cloud account of NSX-T is showing the vCenter and NSX-V is not as per the below shown capture.
After doing all kinds of testing only we move to next step Finish.
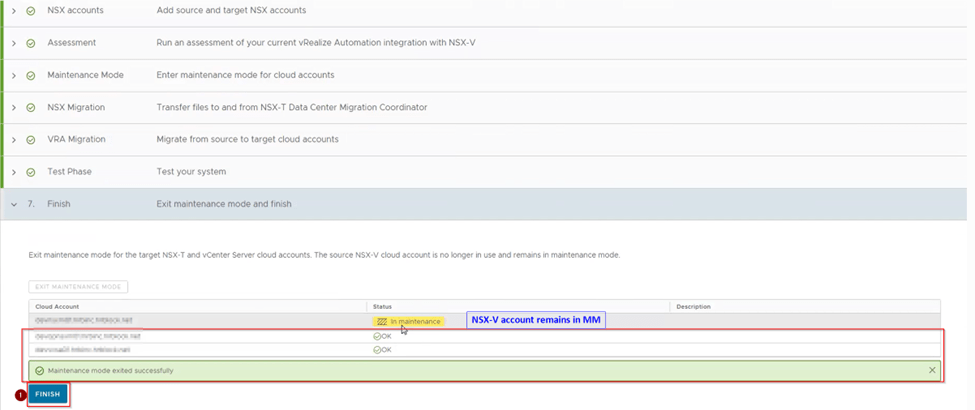
So here we are at the finish step where we see the cloud accounts of NSX-T, NSX-V and vCenter in MM we click on Exist MM which will remove the NSX-T and vCenter leaving the NSX-V in MM as it will no longer be used.
Then we hit finish by which the migration plan on vRA is marked as completed as below capture we can see.
Parallelly after we download the mapping file on NSX-T we can hit finish or when we are done the deployment of blueprint from vRA on step 6 Test Phase.
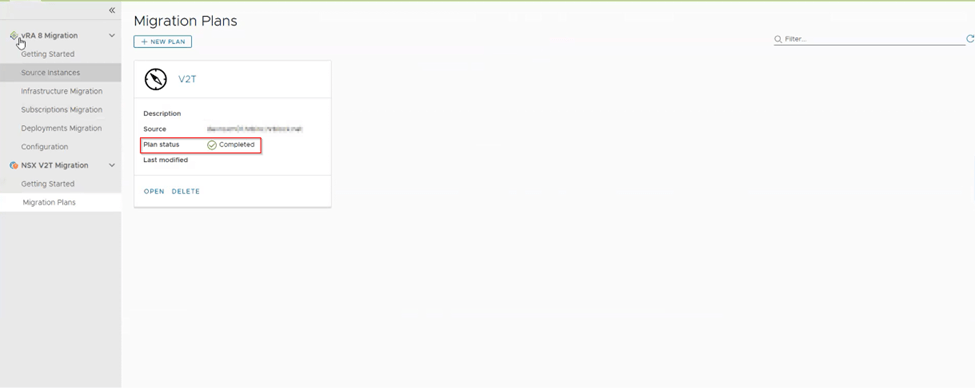
In this migration we did it once we completed the test phase on vRA. Once we hit finish it gives the prompt and tells us to download the mapping file before we exit the migration mode, so review it and then click finish again, it resets the migration tool, which means we have completed the Migration of NSX-V to NSX-T successfully.
Now we are left with post migration task form NSX-T side which we will go through it now in below steps.
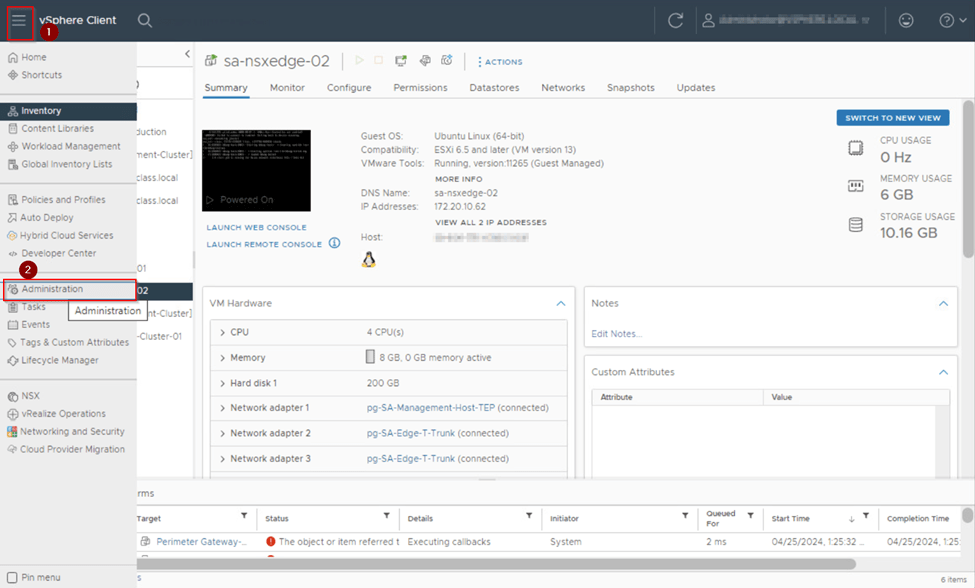
Step 1: We delete the ESX agent manager (EAM) which are associated with NSX-V.
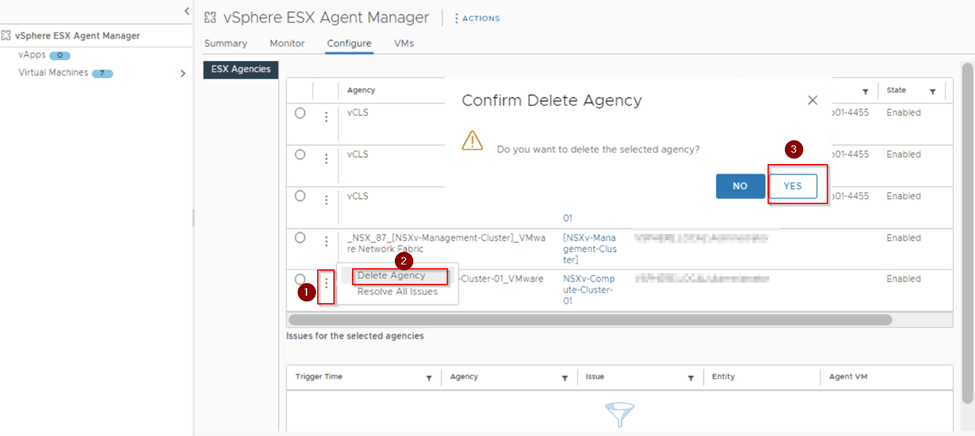
Login to vCenter. From the main menu click on administrator, select solutions and click on vcenter server extension.
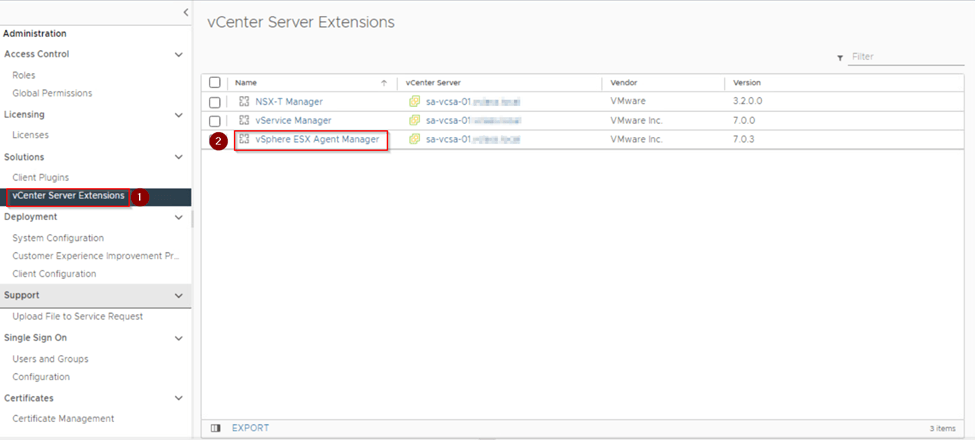
Once click on vCenter server extension, on right side look for vSphere ESX Agent manager and click on it. It will open a new prompt look for configure and click on it.
Once we are on configure page look for _NSX_87 suffix agency and delete those. The number on agency may vary respective to the environment and number of the cluster prepared for NSX-V. In our case it 2 cluster management and compute. So we by clicking on 3 dots and then delete it as we can see in below capture.
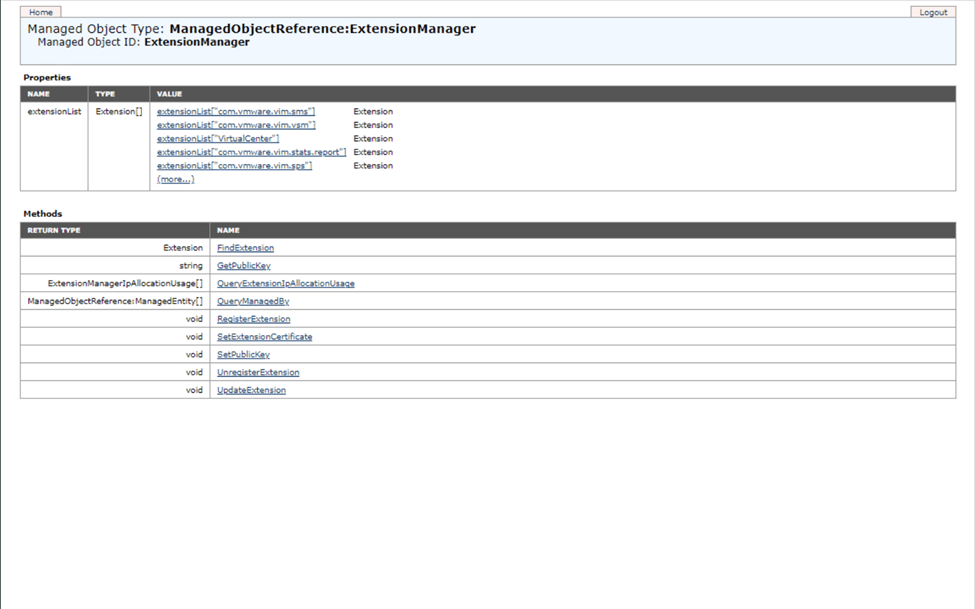
Step 2: Once we delete the EAM of NSX-V we proceed with deleting the plugin from the vcenter of NSX-V on MOB. To access the MOB of the vcenter on browser provide http://<vCenter FQDN>/mob/?moid=ExtensionManager hit enter a prompt occur in that provide the credentials and you see the MOB UI as shown in below capture.
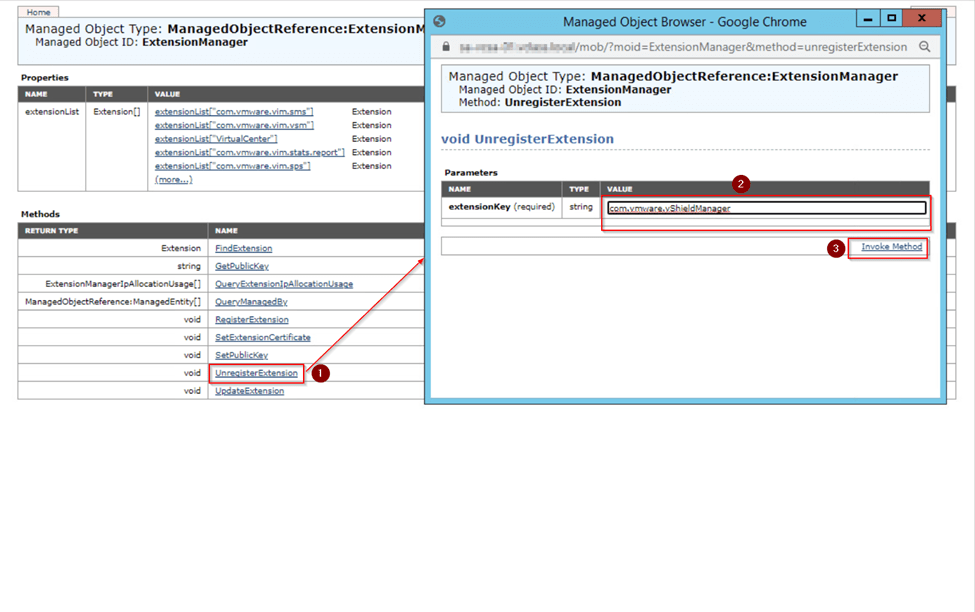
Once we are on page of MOB, look for unregister extension under method and click it. A new window opens on that window enter the below value in value text box one after the other and click invoke method accordingly.
com.vmware.vShieldManager
com.vmware.nsx.ui.h5
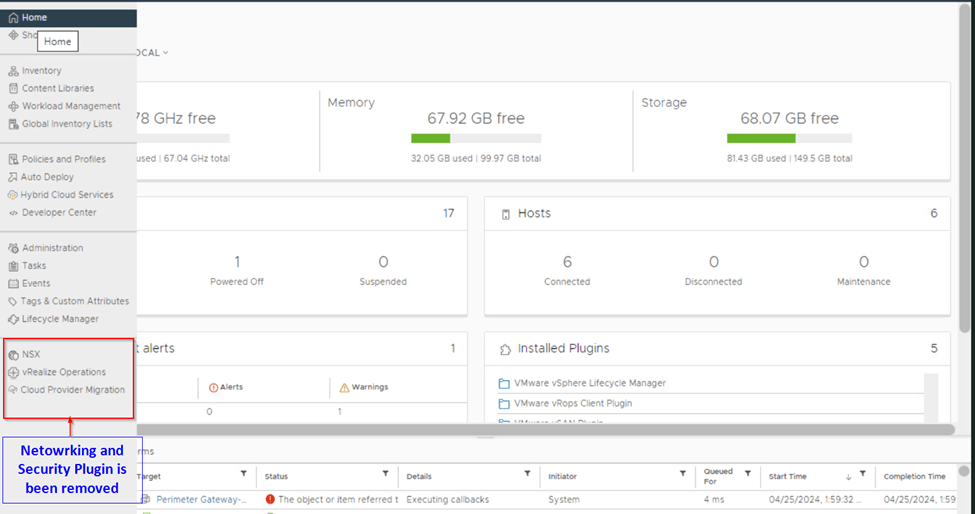
Once done we close the opening window and switch to the vCenter and check the NSX plugin Networking and Security is no longer available.
Step 3: Now we delete the Edge gateways, DLRs, Controllers and Mangers of NSX-V from the vcenter. As well the virtual wires (NSX-V Logical switches) which are created on the VDS via NSX-V.
The deletion of DLRs, edges and logical switches we can do it before we delete the EAM and Plugin directly from the NSX-V UI and then delete the NSX-V manager. Best practice is that we delete the Edges, DLRs and logical switches from NSX-V UI plugin and then delete the manager after deleting the EAM agent and plugin.
Step 4: Deploy the 2 NSX-T managers and configure the VIP address for cluster and configure the backup for the NSX-T.
With this we can say our migration of NSX-V environment is completed along with cleanup.
By this we come to the end of this migration series where we started with Pre-requisites and end with post migration task. During this process we deployed NSX-T and understood the types of migration and methods of migration. We got little understanding of vRA migration plan and its migration flow.
I believe we together have achieved some knowledge migration during this 3-parts series of migration and hope it values you.
Hey, all welcome back, hope you may have gone through the first two parts of the migration process, if not here is the part-1 and part-2 blog.
To have better understanding what we will proceed in this blog. Small Overview from previous blogs,
1. Verification of the NSX-V environment for migration readiness. 2. Deployment of the NSX-T appliance with compatibility considerations. 3. Creation of uplink segments and configuration of the uplink profile with a teaming policy for the edges. 4. Deployment of the edges and integration with NSX-T manager. 5. Conducting a ping test between Edge TEP and NSX-V Host VTEP. 6. Establishment of T0 and uplink configuration with BGP neighborship. 7. Added NSX-T account on vRA. 8. Created the migration plan on vRA and added it in to Maintenance Mode (MM). 9. Generated the .json file and saved it on system. 10. Enabling the migration service on NSX-T. 11. Overview on the different type of migration modes and its types.
Third Step we break into sub steps,
Step 3a: We will focus on the workflow of migration and start the migration process and take a pause on Edge Migrate workflow.
Step 3b: Will focus on Edge Migrate, Host Migrate and then removing of vRA out of MM by providing the mapping file from NSX-T after host migration flow.
This blog we will explore the step-3a and understand the standrad migration flow of NSX-T.
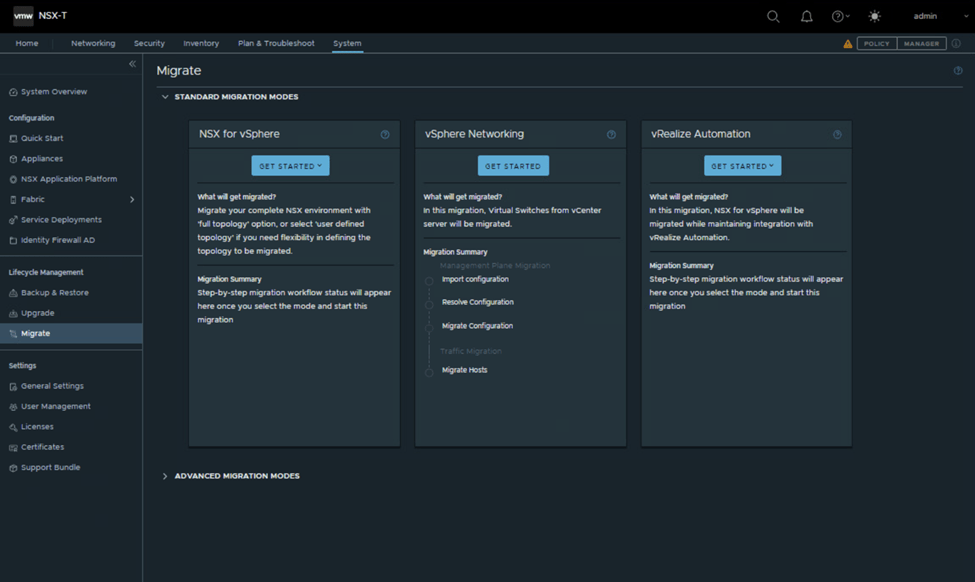
On our earlier blog we have seen the different modes of migration and its respective types with migration coordinator on UI of NSX-T. However, to mention we have 2 types of high-level migration methods.
1.In-Parallel Migration: In this method, the NSX-T infrastructure is deployed on different hardware which is not part of existing NSX-V infrastructure. Here some components of NSX-V and NSX-T, such as management cloud co-exist, however the compute clusters running the workloads will be running on different hardware. Advantages via this method, is we have flexibility on migrating the workloads via lift and shift to new NSX-T infrastructure with cross connectivity between the 2 domains using NSX bridging as an when required no time bond required for completion of migration in one long downtime window.
Note: In built migration coordinator of NSX-T can we used to migration certain configuration like DFW only migration.
Disadvantages via this method, is we require a new hardware, topology and all policies related to NSX-V cannot we leveraged, it needs to be created manually on NSX-T, vMotion has certain limitations which could result in downtime based on the type of the vmotion we select which needs to be taken into consideration. Please follow KB article 56991 for more details. Managing of 2 infrastructures until the migration is completed.
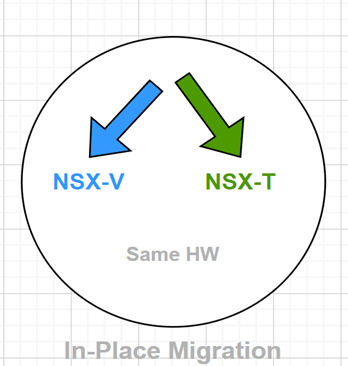
2.In-Place Migration: This is the method, we are using in our migration and the different modes and its respective type which we discussed on our part-2 blog, we use the NSX-T built in migration coordinator tool which helps us to replace NSX-V in-place on existing hardware with NSX-T. Which includes importing the existing configuration from NSX-V and applying it on NSX-T. Migration coordinator supports Maintenance Mode (MM) and migrates the compute hosts running workloads by automatically placing the host in MM removing the NSX-V VIBs and installing NSX-T VIBs.
A brief recap from part one, 1. Verification of the NSX-V environment for migration readiness. 2. Deployment of the NSX-T appliance with compatibility considerations. 3. Creation of uplink segments and configuration of the uplink profile with a teaming policy for the edges. 4. Deployment of the edges and integration with NSX-T manager. 5. Conducting a ping test between Edge TEP and NSX-V Host VTEP. 6. Establishment of T0 and uplink configuration with BGP neighborship.
In this blog post, we will be examining theSecond step of Migration:
Greetings everyone! In this blog post, we will be examining the process of migrating the NSX-V to NSX-T environment, which has been integrated with vRA. We will be demonstrating the migration procedure using the following software versions:
NSX-V 6.4.12
NSX-T 3.2.2.1
ESXi, vSphere and vDS 7.0
vRA 8.10.1
It is important to note that prior to deploying or updating your environment, it is recommended that you consult the interoperability matrix for the version you are utilizing. This will guarantee that your environment is well-prepared for the migration process. If you are planning to migrate, we strongly advise that you check the matrix beforehand to ensure a seamless and successful migration.